Showing posts with label basic. Show all posts

Sunday, 21 February 2021

AMOS Basic on Amiga


In early 1990s, I used STOS Basic on Atari ST for a while, then went over to AMOS on Amiga.

STOS still had line numbers(!) and as far as I remember it did not have procedures. AMOS crammed together a lot of features and resembles Sinclair QL SuperBASIC in some respects.

I was spoiled with AMOS and Basic generally in that just with hitting F1/RUN my program would run in a second. So I've never been especially tolerant towards slow build times.

Blitz Basic helped make more system-friendly code but it was also somewhat trickier to get into.

Installing AMOS Pro with the compiler takes some effort but without the compiler and a hard disk I wouldn't really bother with it. 

Acceleration is very useful too, especially in a setup where a modern PC is used for writing the source and compiling it on a super-fast Amiga emulator. I'll discuss this further below.

Find all the AMOS Pro disks, then the Compiler disk images which has the necessary update/patch. Perform the update on the disk images (couldn't get it to work on an already existing HD install) and then install them to HD.


AMOS basics

The following program opens a 16-colour low resolution screen, removes the cursor and flashing. Then it sets up a few colours and clears the screen.

   Screen Open 0,320,240,16,Lowres
   Curs Off 
   Flash Off 
   Paper 0
   Ink 1
   Pen 1
   Cls 
   Palette 0,$FFF,$F00,$F
   Hide 
   Sprite Update Off 
   Sprite Off
   Print "Hello World!"
   Amos To Front
   Do
      I$=Inkey$
      If i$="q" Then End
   Loop

Using Hide, Sprite Update Off and Sprite Off together is redundant, but goes to show all this variety exists. (Hide simply hides mouse cursor)

Amos to Front brings everything on top. The Compiler can be set to have Amos in the back by default. This way I can be absolutely sure the first thing the executable displays is something I choose, and not the orange AMOS screen with flashing cursor.


Editor and procedures

Compared to modern coding environments, the editor shows relatively few lines. Another problem is that you cannot really split the source into multiple files, so it will easily grow in size. This is something I didn't care about back in the day but I finally have come to see this as valuable.

But at least it's possible to close and open procedures. This means that for a longer program, having most of the code as closed procedures helps keep the source length manageable.

_CIRCLE here is poor use of Procedure

There is some overhead for calling procedures and the compiler can't see a difference between a simple call and a structurally complex one. So, I'd avoid intensively calling procedures. A long FOR loop that calls a procedure to do a minor task can be 2-3 times as slow than one that doesn't.

For example there could be a procedure that draws a screen using 200 tiles, but these individual tiles should not be drawn using procedure calls.

Another editor quirk is the procedure and variable names are always automatically upper-cased. So it's less easy to make any useful distinction between procedures, variables, global variables and "constants" (not that AMOS really has constants).

I've done this: All procedures are preceded with _ and all global variables are indicated with G_ so that for example G_MAXITEMS is a global variable and _CLEARITEMS is a procedure.

Parameters can be passed to procedures between brackets:

    Procedure _ADDITEM[TYPE,X,Y]
        print "I'm adding type ";TYPE
        print "at coordinates ";X;" ";Y
    End Proc

These parameter names are local to the procedure, so I could call another procedure from within this procedure that also uses TYPE, X and Y (integer) variables as parameters. So far so good.

Although there's a neat way to return values from procedures, these parameters are clumsily referred by using PARAM after the procedure call. 

    _ADDITION[2+2]
    print PARAM

    Procedure _ADDITION[X1,Y1]
        RESULT=X1+Y1
    End Proc [RESULT]

So, X=_ADDITION[2+2] is not possible.

POP PROC exits the procedure. POP PROC [RESULT] puts the value in PARAM/PARAM$, otherwise the procedure returns nothing.

In 1990s I mostly used a single global variable like RES to store procedure outputs, and simply avoided using procedure results.

So, although the AMOS procedures elevate the language far above BASICs that don't have them, they are not exactly as powerful as c or Java functions.


Causes and effects

AMOS has quite rigorous syntax for if-endif structures.

I can have the normal BASIC style...

    if FLAG=0 then print "You're Dead!": print "More"

...and...

    if FLAG=0
        print "You're Dead!"
        print "More"
    end if

...is fine too, but...

    if FLAG=0
        if 
FLAG2=0 then print "You're Dead!": print "More"
        if 
FLAG2=1 then print "You're Alive!"
    end if

is illegal, as it combines if-endif and then.

So I have to do:

    if FLAG=0
        if 
FLAG2=0
            print "You're Dead!"
            print "More"
        end if
        if FLAG2=1
            print "You're Alive!"
        end if
    end if

...which is kind of clean but it can be annoying. AND, OR, ELSE and ELSE IF are helpful here, though.


"Cross-developing" AMOS

Above, I complained about the AMOS editor. But there's another way. 

After the AMOS Compiler has been properly installed, it also works from the Amiga CLI. APCmp is the command:

    APCmp source.AMOS INCLIB

INCLIB ensures the outcome is really stand alone and doesn't need an additional library file with the distribution.

Interestingly enough, APCmp can also compile ASCII formatted files, which means I'm not limited to using the AMOS editor. (Sources in AMOS editor are always tokenized).

I'll skip over the idea of using some other Amiga editor for typing the source, and instead use a modern code editor in Linux.

The downside is that the APCmp first tokenizes the ASCII source and then "compiles" the file, and the tokenization phase is what takes a lot of time.

But this is not the end. Although my Raspberry Amibian setup can be too slow for this, it doesn't mean everything is. So, using UAE in my main Linux box, setting the processor/accelerator to Blizzard 1230 IV, the resulting "Amiga" is considerably faster than the Amibian. Then the AMOS tokenization/compilation time will be shrunk to almost nothing for any reasonably sized source.


This means I can edit my AMOS source in sublime-text in Linux and compile with CTRL+B build command. This needs a Makefile/script that combines different separate files in the project folder and dumps the thing over to the UAE Amiga disk image folder. 

Something like this:

    cat *.txt > source.asc
    cp source.asc /path/to/amiga/harddisk/folder/amosstuff/source.asc

So I can have any txt file as part of my source without explicitly defining them in the Makefile or the script. 

Yes, CAT combines the original sources in alphabetic order, so if this approach is taken some care should be taken when naming files. As all the source snippets are filled with procedures, the order doesn't matter that much. 

I can still name a file aaa_main.txt if I want a particular block to come up first. One thing to remember is that global variables need to be declared before they are used.

On Amiga side I still need to run the compiler from CLI, perhaps using a short script that both compiles and runs the program:

    APCmp source.asc INCLIB WB NODEF
    source

I saved this as "build" on the Amiga project folder and then used "execute build" to run it from the CLI.

(INCLIB means the library is integrated with the outcome file. WB puts workbench back on start and NODEF means no default screen will be opened.)

Of course, it is only at this stage it will be revealed if there are errors in the source, and not inside the Linux editor. Also, the line numbers in the errors refer to the source.asc file, but it's not too hard to check that in the Linux side.

AMOS editor is still friendlier about errors and easier for debugging. But the fast speed of the UAE environment means that if the code crashes totally, it doesn't take too long to get back to the command line.

By the way, writing Processing/Java and AMOS in same session can be confusing! AMOS procedure inputs are marked with [ and ], dimensioned arrays with ( ), with Processing it's the exact opposite. With AMOS, you can't have ; at the end of the line, equality checks are = and not == and so on and on.

The subtly dangerous thing with AMOS is that as variables don't have to be declared, I can mistype a variable name and it does not register as an error.

A syntax pre-checker at the Linux end might be helpful. Also, while at it, allow more modern syntax and have procedures converted to GOSUBs or even unrolled, when possible.

So, perhaps goodbye to fiddling with Amiga keymaps and AMOS editor idiosyncrasies? Of course I'll lose that AMOS feeling. Snif.


Hiding AMOS

I already talked some about Amos to Front and hiding the "orange screen" effect that plagued many AMOS programs.

I used to be careful with hiding if a program was written with AMOS. This made sense as often the first impressions are important. If anyone saw it was a BASIC program to begin with, it might get a negative response. Although some might go "wow, was this really made in AMOS?!"


Apart from the orange screen, AMOS programs can be revealed by using Amiga-A to flip back and forth between the program and workbench, or using Control-C to break out. These might not be uncommon key combinations, but together they can be revealing. 

BREAK OFF instruction can remove the latter, and AMOS LOCK disables the Front/Back switching. The counterpart is AMOS UNLOCK. Locking can be unfriendly though, considering the programs seem to multitask nicely enough. Yet if I intend to spread the software on a floppy disk image, it might not matter.

Function AMOS HERE results in true or false. With this it's possible to see if AMOS is currently in the back or not. This way the program might be stopped from using CPU too much, but I've not really tried it.

What remains is that if there is file access, and the device is not present, AMOS compiled programs will open an ugly AMOS-like dialogue box.


System friendly?

Although AMOS programs are self-contained, it's still possible to write shell-runnable programs that don't open a screen at all. The string variable COMMAND LINE$ holds the arguments. AMOS executables tend to be huge, so it's not an ideal way to write tiny commands.

Graphics is a thornier issue. In later days, more modern graphics modes came available and software that didn't play nice with these new modes were frowned on.

But Amiga 500 itself is now increasingly recognized as a retro platform on its own right, despite any newer developments. So it is possible to target the Amiga 500 and care less if the program works on some new-fangled Amiga or not.

Looking at the AMOSPro manual, there are ways to access the Amiga libraries so who knows, it might be able to set a system screen/window.

Some speed considerations

To get some more speed out of AMOS, there are some simple guidelines that can be followed.

I already mentioned the dangers of using procedures in a wrong way. I also noticed GOSUB/RETURN is faster than calling a procedure without parameters. This puts to question whether PROCEDURE should be used so much after all.

Integer variables (1,2,3,4...) should be favored. Floating/real number variables (1.0, 2.0, 3.0, 4.0 ...) are indicated with # so that variables like X# and Y# are floats and X and Y are integers.

If no complex evaluation is needed then Add X,1 should be faster than X=X+1 and Inc X should be faster still.

Adding a variable to another such as Add X,Y does not seem to slow down the computation much.

However, after compilation the difference of these tends to shrink to almost nothing. AmosPro allows compilation+running within the editor environment so comparing non-compiled with compiled sources is quite easy. Set TIMER=0 before your test loop and then print TIMER afterwards.

It can be useful to reduce multiplications and complex equations in a loop.

For example:

    For I=0 to 99
        LOC=BASE+I*32
        if peek(LOC)=1 then Inc A
    Next I

Consider this instead:

    LOC=BASE
    For I=0 to 99
        if peek(LOC)=1 then Inc A
        Add LOC,32
    Next I

Again:

    For Y=0 to 10
        For X=0 to 10
            LOC=BASE+X+Y*40
        Next X
    Next Y

This is faster:

    LOC=BASE
    For Y=0 to 10

        For X=0 to 10
            Inc LOC
        Next X
        Add LOC,29
    Next Y

Also, if a calculation like AD=AD+Y*WID needs to be done a lot, first Z=Y*WID and use Add AD,Z instead. (If Z doesn't need to change)

Unrolling is helpful in BASIC too, and the compiled code also benefits from it. So, instead of the first example:

    LOC=BASE
    For I=0 to 49
        if peek(LOC)=1 then Inc A
        Add LOC,32
        if peek(LOC)=1 then Inc A
        Add LOC,32
    Next I


AMOS and machine code

Writing 68000 machine code is not super-hard in itself, but on a complex 16-bit computer and OS like the Amiga it's a chore to get something visibly up and running.

I've used AMOS as a frame to which I can add some machine code at speed-critical points.

Just to prove it works:

   Reserve As Data 10,65536
   Doke start(10),$4E75
   Call start(10)

The machine code routine is called from the start of the bank 10, where I have reserved 64K of memory.

Then I have used doke (16-bit length POKE) to write the value that corresponds with RTS so the only thing the routine does is come back to AMOS.

This is a very silly way to insert 16-bit code. It is better to load in an output binary from an assembler:

   Reserve As Data 10,65536
   Bload "output.bin",start(10)
   Call start(10)

Assuming the binary is less than 64K long.

As the start address can be where ever AMOS has reserved the memory area, the code has to be relocatable. This isn't a huge deal, for example vasmm68k knows to produce relocatable and optimized code just as long the ORG/* statement is left out. 

Vasmm does a lot to ensure the code is relocatable, but the programmer still has to know some things. For example, it's not possible to move a label address directly to a d-register. It's possible to do move.l #label,a0 because the compiler changes it to lea, but this has no counterpart for d-registers. (Edit: This explanation is not correct, the move instructions have (pc) relative addressing modes just as lea does, it's just that in practice the compiler allowed the use of LEA without explicitly stating a relative addressing mode.)

Register values can be set from AMOS using areg(n) and dreg(n), corresponding with the a and d registers of the 68000. The dreg 0-7 can be freely used whereas a-register 0-3 are available. 

This isn't a limitation, for example areg(0) could point to a start address of a memory area that contains a large table of values you want to use from machine code. Or, the table is inside the assembly binary in a reliable location you can access from AMOS.

To give some clarity the start addresses can be variables. E.g. G_REFRESH=Start(10): Call G_REFRESH

I stored a calculation result in a variable that was apparently in 0-255 byte boundary but became something else in the assembler. I learned AMOS had signed the variable during the process. This helped get rid of the sign:

    If A<128 then A=A AND $7F: Areg(0)=A

This means that even if AMOS prints the variable content as 84, it might be internally something else. It's possible the transition using areg(0) is buggy, or I have not understood something. If the variable is directly set as A=84: Areg(0)=A there's no trouble.

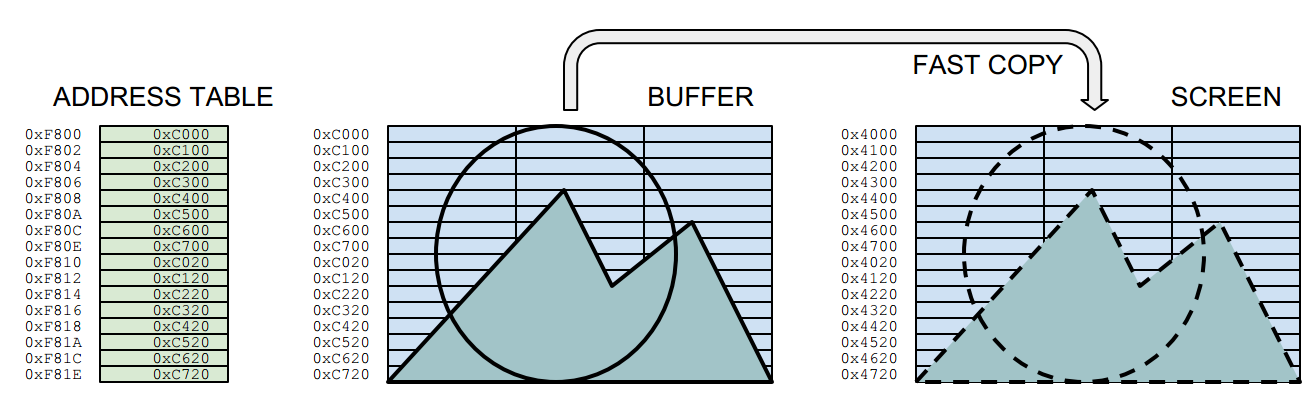
Phybase(bitmap#) and Logbase(bitmap#) are AMOS variables that have the addresses of the current screen bitmaps. If double buffer is on, then Phybase will point to the start of the visible screen and logbase to the "logical", the hidden screen. Screen Swap will change these addresses.

So if you use areg(0)=phybase(0) you can transmit the start of the screen bitmap 0 over to the machine code, for custom graphics routines.

There are a few ways an Amiga can set up a bitmap screen. AMOS reserves screens bitmaps with one bitmap after another and apparently you can't tell AMOS to do otherwise. (The other way would be to store bitmaps so that all bitmap lines follow each other.)

In my experience, drawing grids of 16x16 (or 8x8) tiles with 68K is considerably faster than AMOS at the same job with a PASTE BLOCK loop. This helps a lot in purely tile-based screens.

Something I've been working on...

Other than that I don't know if it's wise to try write faster graphics routines than AMOS already does.

As an aside, I found out the hard way there is a difference between how 68000 and 68020 can handle some operations. It's better to have any word-size (move.w) operations on word-aligned addresses, (e.g 0xdf000 is okay, but not 0xdf001). 

Even if 68020 doesn't crash on these, the plain 68000 does. I spent some time wondering why particular code did work on the WB3.1 68020 emulator environment but not on the real A500, thinking I'd run out of memory or did some other cock-up.

Obviously byte-size operations (move.b) are fine on any kind of addresses. It's just that when possible, moving words and long words is much more effective.

Friday, 31 May 2019

Sinclair QL SMSQ/E experience on Super Gold Card

What makes QL literature near unreadable is that there is a long tradition of naming everything in an obfuscated manner :) So, we have QL, SMSQ/E, MDV0_, TK2, QL-SD, WMAN, PENV blah blah blah.

For text-based environment it's handy to have somewhat shorter names for things but damned if it ain't difficult sometimes to remember the keywords.

So welcome again to the Sinclair QL world both wonderful and strange (to borrow a phrase).

What I am mostly looking at is the SBASIC with the Sinclair QL SMSQ/E operating system.

I realised SMSQ/E can nowadays be downloaded freely as a binary and made to work on a Goldcard or Super Goldcard-equipped computer. It's not possible to have a replacement ROM, but the loading time is bearable with Super Gold card and QL-SD card reader.

To distinquish from SuperBASIC, the BASIC in SMSQ/E is called SBASIC. I think in the past I may have used "SBASIC" or "Sbasic" as a shorthand for SuperBASIC but it really is a bit different thing.

I usually feel it's more interesting if the BASIC is contained in ROM, because that is what makes it the standard for that machine, part of the experience of that machine. However, SBASIC doesn't differ that much from SuperBASIC, it's more of an extension than an alternative. So I feel like I'm not violating a huge principle here.

The SMSQ/E integrates the Pointer Environment, Window Manager and the Hotkeys System 2, so I'll touch on these topics too.


Getting SMSQ/E to run and boot

Download the goldcard.bin and rename it for example as SMSQGC_BIN

It's one kind of ordeal to transfer files over to the QL. I used my own solution for transferring files using the HxC Floppy Emulator hfe disk format.

When the file is on your QL disk, it can then be LRESPR'd. (Here we go again with the handy keywords)

I needed the Toolkit 2 to get the LRESPR command. It's a pity that although TK2 is also integrated in the SMSQ/E, it has to be invoked before it can be loaded? Handily the extension is part of the Super Gold Card, although it's curiously slow to activate. But anyway, TK2_EXT is the command.

Then, use LRESPR FLP1_SMSQGC_BIN (or SDC1 if the file is on QL-SD) and the file will be loaded and run like a resident extension.

Well, I can use

a=RESPR(240*1024)
LBYTES sdc1_smsqe_bin,a
call a

...to run the SMSQ/E file without resorting to TK2. I'm not sure if there are any downsides, seeing as the new system discards everything that happened at that point. At least this way I save a few seconds of boot time.

Using JOBS and HOT_LIST after booting through various files
Now we have the familiar divided red-white-black screen. The WTV command might be the first remedy if the image does not fit the screen.

I found I can't use the SDC1_ to reboot to a boot file on that drive after the SMSQ/E has started. The BOOT file has to be on FLP1_ so for the purposes of writing boot files I have my HxC connected to the disk interface of the Super Gold Card.

For example, as suggested above, the boot has to first activate TK2_EXT, then LRESPR the SMSQE_BIN. But after this has been done, the boot will not continue executing the lines, but SMSQ/E will boot again the BOOT file from FLP1_ drive.

So, in the worst case it will simply start reloading the SMSQ/E binary file again! This can be avoided by using

IF VER$<>"HBA" THEN TK2_EXT : LRESPR SDC1_SMSQE_BIN

...which means the file will not load if we are running the boot from inside that version of the system. Obviously the correct version string has to be checked from within the SMSQ/E by PRINT VER$.

After this my system will turn over to the SDC1_ as it is faster than the floppy emulator.

I've understood SMSQ/E uses many of the screen and graphics speed-up routines similar to what used to be in separate extensions over the years. This is not especially noticeable when drawing lines, but the BLOCK command is indeed lightning fast compared to normal SuperBASIC. It might be the Minerva ROM already speeded the lines up, if anything.


Multiple SBASIC interpreters

The Pointer Environment does not mean that on running SMSQ/E you'll automatically see a mouse pointer and menus, it is up to the programs to do all that. But what the PE does do is that the multitasking SBASICs will handle the screen area in a more ordered manner when switching between jobs. Let's look at multitasking SBASIC.

Ineffective, but there it is: Two SBASICs drawing on their windows, on the same screen.
A new multitasking interpreter can be invoked by simply typing SBASIC. You might make a couple of interpreters, and put a program looping in each one of them. It's possible to switch between these jobs with CTRL-C.

QUIT exits the current job. RJOB removes a job with name. JOB_NAME "kekkonen" gives that name to the current job. JOBS lists to jobs as with Toolkit 2, with the job names given.

Sometimes I've experienced that a stopped program may be 'unfinished' so that it can't be removed with QUIT or RJOB. Could it be that files have been left open, I don't know.

On a whim I created a program I called 'jobkeeper', that simply clears the screen, prints the DATE$, lists the existing jobs using the JOBS. It also shows the remaining memory. The contents are refreshed every 5 seconds or so. PAUSE is used for timekeeping.

This way very little resources are taken from the other jobs. It was educational in looking how multiple SBASICS could be set up and viewed from this little 'jobkeeper'.

I notice there are not many ways the jobs can interact with each other via BASIC, I suppose switching to another job screen through a command is a no-no, and can only be achieved with the CTRL-C key or a Hotkey.

I've not looked too much into how jobs might communicate with each other. I've understood they can share channels. In recent versions SEND_EVENT and WAIT_EVENT can be used to send bits between SBASIC jobs. The program that is on x=WAIT_EVENT will be on hold, and after receiving an event the x will contain the information.

Screens grabbed on a real physical QL. I'm so proud! The date is printed by a different job.
As I said the integrated Pointer Environment helps keep the screens clean when switching between jobs. If the different BASIC jobs don't have overlapping windows, you can see the jobs using the screen at the same time. In the above example another SBASIC job prints the clock on top of the screen, above the default window area supplied by WTV. The clock stays visible and be updated while I work on the BASIC program that displays a chessboard.

Messing with multiple windows at the same time can get quite slow quite quickly even on 68020, but by managing time and pauses a couple of SBASICs can happily coexist on the same screen. Jobs that work completely on the background don't slow the computer that much.

One nag I have is the screen MODE is forgotten when switching between the jobs, which results in messy screens when changing to a job that was originally on a different MODE. However this may be intentional and there are situations where it might be impossible to resolve the correct MODE in a satisfactory way. So better try to stick to one mode.


Hotkeys


This is one of the neat extensions integrated to SMSQ/E. You have to HOT_GO to activate it. A new job will remain resident and keyboard can be aliased into commands that should work throughout your system. The normal ALTKEY would just push the commands into current keyboard buffer, which is not that useful. The hot keys can activate other programs and BASIC commands even if you are not on the BASIC console.

This does not mean you can simply activate a compiler via a BASIC command, though.

Normally in basic, supposing I have copied both my compiler, linker and sources to RAM1_ I can do this:

EXEC_W ram1_qmac;ram1_source: EXEC_W ram1_qlink;ram1_source

and make it into an altkey, which again will not work from inside the QED editor as it would simply paste the command there.

QED job window on top of BASIC windows
And, although the above can be run as a BASIC command with the hotkeys HOT_CMD, as far as I see it won't really fly.

Instead you could associate the compiler and the linker to two hot keys, r and t respectively:

PRINT HOT_LOAD ("r","ram1_qmac";"ram1_source")
PRINT HOT_LOAD ("t","ram1_qlink";"ram1_source")

...passing the source file name trunk as a parameter.

Now I can work on a source inside QED editor, and use the hotkeys to compile to check it for errors, without exiting the editor. The fact that I've removed the wait time from my compiler end results becomes harmful; it goes back to QED so quickly I can't really see what the result is!

The HOT_LOAD won't simply accept a raw output binary, and it might be wiser to call the binary outside the QED editor anyways.

Although I can't run the compiler by a BASIC command through the HOT_CMD call, I can get around this by setting a separate, parallel SBASIC program that can be invoked using HOT_PICK. This program could then call the assembler, linker and even execute the result.

I used a bit similar technique for getting the above screengrab from QED. A separate basic job waits for keypress, then waits 5 seconds (for me to switch to the QED job) and stores the screenbuffer using SBYTES ram1_screen,131072,32768. Because this happens no matter what is on the screen at that point, the QED job screen can be grabbed.


Afterword

Years ago, when the standard QL was the only thing I had tried, I asked what would have happened if the Sinclair QL approach got to mature over the years? Well, SMSQ/E and SBASIC is one step in that process.

SMSQ/E and SBASIC powered with the Pointer Extension and Hotkeys shows how cool the original Sinclair QL environment can be when some more thought and development has been put into it.

I like that with Sinclair QL, there is less distinction between using the machine and programming it than in computers like Apple Macintosh (and pretty much everything that came after). This makes it it interesting to tinker with.

I have not really compared the role and functionalities between the Minerva ROM and SMSQ/E.  Minerva functions would deserve a blog post in itself, perhaps some other day. The one thing I notice the dual-screen boot option of Minerva does not seem to mean anything after the SMSQ/E has been launched. This means the code I wrote utilizing page flipping on the assumption of Minerva being present, won't work. The lesson is perhaps: don't assume the presence of Minerva.


After-afterword:

This was the first time I started experiencing hiccups with the QL-SD card reader. At one point the card simply refused to write or delete anything, instead locking up the entire machine at that point, jobs and all.

I tried to re-format the card and copy the BDI disk image there, and this worked for a bit but alas the problem reappeared. I've been told QL-SD is not very compatible with Gold Cards, but as I had so far had no problems I felt I might be lucky. Alas, apparently no. Some more investigation is in order.

Wednesday, 22 June 2016

Horizontal starfield in BASIC

Scrolly stuff is a bit hard in eight-bit BASIC, so of course it had to be tried.

Horizontal scrolling is an interesting case as the environment usually does not have special commands or ROM calls for that. Also, starfields are kind of easy/fake scrolling as there's no real bitmap or background to move.


Commodore 64

In the first version, I was silly enough to use dimensioned arrays and a FOR-NEXT loop for drawing the eight stars. POKE seemed slow in this context and I abandoned it for a while. The C64 BASIC does not have a LOCATE or PRINT AT command, so the horizontal/vertical coordinates had to be handled with the TAB function and/or character control codes. This means that for the speed of the program it is not trivial where the stars are vertically. I settled for 8 stars with one row between, filling about 2/3 of the screen.


I did know from experience that it is not necessary to test each star x coordinate every time the coordinate is reduced. After the eight stars are moved, only one of the star coordinates is checked. With stars it is acceptable if they disappear at a bit randomly near the left side of the screen.

For the second version, I unrolled the code and did away with the DIM at the same time. So each star has their own separate variable. Because of the single-star coordinate testing, the star printing is unrolled eight times, and after each printing only one horizontal coordinate is compared.

40 print chr$(19);tab(xx);"* ";chr$(17):xx=xx-1
41 print tab(xa);"* ";chr$(17):xa=xa-1
42 print tab(xb);"* ";chr$(17):xb=xb-1
43 print tab(xc);"* ";chr$(17):xc=xc-1
44 print tab(xd);"* ";chr$(17):xd=xd-1
45 print tab(xe);"* ";chr$(17):xe=xe-1
46 print tab(xf);"* ";chr$(17):xf=xf-1
47 print tab(xg);"* ";:xg=xg-1
65 if xx<9 then poke 1025+xx,32:xx=35

(repeated eight times, with the last line comparing a different variable)

I also tried to combine the character formatting codes and printed stars into one long line, but this was a bit slower.

By using POKE instead of PRINT "* "; statements, although previously unsuccessful, I could now get an extra bit of speed. The third starfield is faster, but it also flickers a bit. Possibly not so visibly on a tube TV.

20 poke ba,32:ba=ba-1:poke ba,42
21 poke bb,32:bb=bb-1:poke bb,42
22 poke bc,32:bc=bc-1:poke bc,42
23 poke bd,32:bd=bd-1:poke bd,42
24 poke be,32:be=be-1:poke be,42
25 poke bf,32:bf=bf-1:poke bf,42
26 poke bg,32:bg=bg-1:poke bg,42
27 poke bh,32:bh=bh-1:poke bh,42
29 if ba<1032 then poke ba,32:ba=1063

(repeated eight times, with the last line comparing a different variable)

One advantage is that the POKEd stars can be more freely located around the screen, but also their color is not specified and in principle the color memory could be pre-filled with interesting colors.

The alternative would be using a char display that is pre-filled with * and the POKEs would address the color memory.

A larger number of stars, or even a kind of parallax is also possible, but I want to keep the program version speeds easily comparable.

I used petcat (one of VICE package tools) to convert text files into a basic PRG.

All three starfield program versions are downloadable from here:

http://csdb.dk/release/?id=148877


ZX Spectrum

I could transfer the above insights into a finished result almost straightaway. The screen memory is filled with ****oooo---- type pattern and the attribute space is filled with black-on-black.

Then the POKEs adjust the attribute memory just as the Commodore 64 version used the character screen memory. This way it's possible to have some advantages of a character display on the Spectrum bitmap screen, as shown in many machine code demos and games.


I also tried a PRINT AT -based version that does not use POKEs. It might be just a tiny bit faster than the POKE-ing, but not enough to justify it.

Perhaps surprisingly, despite all the talk about Commodore Basic being slow, the ZX Spectrum version is not really faster. It's a bit difficult to compare through eye-ball judgment, but given that the Speccy screen is 32 characters wide and C64 is 40, one might even say the C64 BASIC is more effective here. Obviously this character-based starfield is not an indicative comparison of the two Basics overall, for example bitmap graphics is practically impossible on C64 Basic.

I used zmakebas to convert text files into a TAP.

Download the zip with the TAP and the text file from here.


MSX

I made a short attempt at replicating the approach with MSX basic, where I had to use a LOCATE/PRINT based approach as there's no real way to POKE directly to the screen.

I could not easily find an equivalent of petcat/zmakebas so I simply wrote the listing in an emulator. However I crashed my openmsx trying to save the machine state so the motivation for the project sort of dwindled. But what little I got did seem a little faster than the Spectrum and C64 versions. I could not really go into potential SCREEN 0/SCREEN 1 differences, though.

Thursday, 20 November 2014

BASIC Interpreter


I have been doodling a BASIC interpreter, written in Processing. A BASIC interpreter is something I've always wanted to do, with varying levels of ambition, resulting in various abandoned attempts.  "Abandoned" meaning they couldn't be said to work as BASIC. Now, the current project is beginning to resemble a working language.
The multiplication table in "hi-res". Note that the FOR...NEXT structure is still absent. Also, the parser currently requires some superfluous brackets.
Instead of trying to create a modern IDE + compiled BASIC (which there are plenty), I wanted to make a sort of virtual computer inspired by 1980s machines, with limited fixed-memory space and limited character "display modes".

I'm also trying to project how BASIC-based computers might have developed if history had followed another course. This shouldn't be taken too seriously, though. What's here is a mash-up of cherry-picked features benefitting from hindsight. For example, even if I've kept the graphical capacity of the "computer" pretty low, the storage space is near-infinite. This was not at all the situation in the end of the 1980s.

Although I admire various BASIC interpreters from the 1980s, the most significant source of inspiration comes from Sinclair QL SuperBASIC environment. I like the idea that a computer would be used not so much for running "apps", but giving enough building blocks for making interesting things. Arguably Linux/UNIX environments do this already, but woefully they inherit a bit too much from the text-terminal days. Instead, the BASIC interpreters were directly coupled to visuals and sound. Currently the emphasis is on a character display-style interaction with the visuals, but other "display modes" could be inserted just as well.
The obligatory "scroll some random garbage on screen" program.
The virtual machine contains 128K of "RAM", which is partially mapped as character display, character set graphics, free memory and system parameters, BASIC listing, variables and stack, just like the 8-bit computers.  I'd say this arrangement was even helpful at times, as it creates a straightforward division between "in-computer" variables and the Processing variables: the entire memory and all the virtual computer parameters are simply inside a byte array in Processing.

Although a Sinclair-style separation of graphics and command entry has merits, I went for full-screen cursor editing. (With some as yet half-baked windowing features.) The BASIC listing is line-numbered, something I chose for simplicity but also for certain immediacy. If it's not meant to be an IDE, let's not even go halfway there. Supporting some labels might still be viable, and I hope to have Sinclair QL-style procedures unless they prove to be too difficult.
A fragment from a BASIC program for editing the character set. It's a bit slow.
I kept the amount of memory low (128 kilobytes) because I wanted instant saving and restoring snapshots of the entire machine state, and for this reason the images should not take too much space on the disk. Saving the entire memory is much like saving a snapshot in an emulator, everything will be conveniently contained in it, colours, character display, character set, cursor position, BASIC listing, system variables, just everything.

One difference to emulators is that the snapshots can be loaded with commands during run-time. A major reason for this is to enable hypertext elements for traversing between snapshot images. So it's not necessary to "program" anything to make use of the screen editor. The old BASIC systems worked as on-screen scratchpads, and here, before the BASIC was functional, I could use the screen editor as a notepad for future features and to-do lists and general thinking-out-loud.

The system variable reference, as a memory snapshot. The [bracketed] text typed on-screen act as commands, which may invoke other memory snapshots.
However, I did not go so far as to emulate a processor, in which the BASIC would run. This would have been cool but far too difficult and time consuming for me at this moment. I have to raise a hat to anyone who made these things work in the 1980s and before. Here the Processing code is used to parse the BASIC commands, arranging all the memory reads and writes and handles the updating of the display.

What's the most difficult part here? The "pipeline" of functions that identify the keywords and elements in a BASIC statement and return values to various expressions and functions.

This kind of line could be entered in the full-screen character display:

CLS: PRINT "Hello world: ";PEEK(32128+PEEK(64));" times"

After the program scoops the ASCII string from the full-screen editor, it is sent to the pre-parser, which decides whether it ought to be added to the BASIC listing (not, because there is no line number) or run immediately.
A one-time scheme of the command pipeline, as a memory snapshot.
When run, the pre-parser splits the line into the two separate command lines, CLS and PRINT, divided by colons (:), yet ignoring the colon inside the quotation marks. So far quite simple. Then the command lines are sent one by one to the proper parser, which splits the statement into components. The components are separated by either space, comma, brackets and so on. (This is a bit more complex than I'm letting on).

With PRINT, the parser needs to handle an arbitrary amount of expressions, which can be strings or numeric variables or functions, usually separated with a comma. All of these are sent one by one to the Resolver, which identifies other parts as strings and others as something to be sent to the Calculator/Counter. The Counter is a recursive function which breaks the PEEK(32128+PEEK(64)) part, first the PEEK(64), re-working the initial string into PEEK(32128+1) (for example) and then into PEEK(32129), which is finally seen as a straightforward function, returning the contents of the address 32129, which might be 255. This is turned into a string and put on screen.

This is all a bit messy, and my hands-on style of improvisational programming means that a change in one part easily means an unexpected result in some other part. It's all been going on fairly well, though.
Possibly a support for cyrillic alphabet...
Is it available? No, at least not yet. Probably never, if past projects are any indication. There's too much work to be done ensuring the program works nicely and does not provide a potential backdoor for destroying somebody's files. If I do my own programs for myself there is a massive amount of work I do not need to care about. (better error-handling, some user-friendliness, manuals, support) There's a message here somewhere, I think.

Why? It's an interesting thing to do. Also it might help in devising scripting languages and word parsing for something unrelated.

Monday, 12 May 2014

Blog post written with QL SuperBASIC


(The text below was written entirely as a Sinclair QL SuperBASIC program, as an experiment to see how this computer from 1984 could be used for writing, without using a dedicated word processor application. At the same time, the text goes to describe the approach I took. I have not edited out or removed any typos or repetition, as they can indicate challenges in the approach. The mechanical paragraph division is also quite telling. The images and captions have been added in the Blogger.)

One of these, in case you forgot.

Introduction

I have previously suggested that the Sinclair QL is unique among the earlier home micros in that it might not need apps for rudimentary tasks. I made crude experiments with 3D 'modelling' and extrapolated that it might be a viable approach were the QL more powerful.

I did think however that this was mostly because the old BASIC-enabled micros were good as a graphic notepad, but for many other tasks the approach would not do. Now I'm beginning to feel that at least for writing, the QL superbasic might offer some ways in to writing.

It struck me that the QL might be easily used for producing text, without resorting to a word processing package. Obviously, there might be limits to the length of text that could be reasonably produced, but then again my modelling experiments were not professional quality either.

Such a project might go two ways. I could try to write a small text editor that would store the written text into memeory. Or I coold write the text as a program. I went for the latter, as it seemed to me more in the 'Spirit of QL', needs less programming talent, and frankly, might be the more powerful approach.

The Approach

The root idea is simplistic. One might take any old BASIC-equipped computer and type text into REM lines. I could then say this was what I was looking for: a way to produce text without an editor. Yet, with the QL, I was looking for something a bit more flexible.

I've taken the notion that the paragraph is the defining unit of text, and built a program around it. A paragraph, when thought out well, carries through a single idea from its' presentation to a closure, preparing for the next. I defined a PARAGRAPH proccedure which simply takes a text string as an input. The procedure then prints the text, tabbed and separated with a line from other paragraphs.

Preparing to edit The Approach subheading, consisting of three paragraphs.
A paragraph is a suitably short unit of text to be handled in the slow SuperBASIC console. Even then, the few sentences need to be written quite unhesitatingly into a finished condition, because editing the middle and the beginning of the paragraph easily becomes too slow.

Structuring the text

The text body could be a list of PARAGRAPH lines, but it is also useful to have some control over the entirety of the text. For this purpose, I made each text subheading into a named procedure, such as INTRO, APPROACH and STRUCTURE.

The procedure definitions at the heart of the program. The variable CH indicates the desired channel. CH=1 would send the text to screen.
Each of these procedures are made from a heading line and a few paragraphs. The HEADING is another procedure, which simply prints the intended heading name and a separating line. So, when the program is RUN, the text will flow from top to bottom, separated with the appropriate subheadings.

However, the best use for these structuring procedures is that from the console they display a particular portion of text. It is better than using the LIST command in conjunction with line numbers. Now, INTRO can be used to view the introduction, APPROACH the middle part and so on and on.

Listing the The Approach subheading using APPROACH procedure.
I tended to keep each section below such a length that it would about fit the Sinclair QL screen in 80 column mode. This way, a portion could be seen at a glance. This of course limits the kind of texts that are meaningful to produce in this manner. CTRL+F5 can be used for pausing the overlong text, though.

Experiences during writing

I noticed there was still a need to contain each heading into a simple to grasp system of line numbers, so I could use a LIST command to explore the section under writing. I put each of the headings 100 lines apart, so a simple LIST 100 TO 200 would give the introduction, for example.

Although the paragraph and heading system could be used for shifting chunks of text into different order, I still found it most effective to write the text mostly in the order it was needed. I had very little need to change the location of written text. It was more likely I could write 'in between' existing text using a new PARAGRAPH line. 

I have shown the way text can be easily produced and viewed, but there is still the need to store the text into a proper ASCII file. For this purpose, some more programming is needed. (But not much.) The procedures that use a PRINT command text, ought to print to a channel. This way, the channel can be a file or a serial output.

Concluding remarks

I hope the above works as a kind of a proof-of-concept for showing that the QL could be used for text editing purposes even without a dedicated app. The SuperBASIC lends enough power to structure the text beyond the most immediate editing capabilities.

The part of the listing that describes the entire text structure. RUN would then list the whole text.

Again, this experience can be extrapolated, asking the question, what if QL was much more powerful and flexible? This kind of approach to text creation might be more interesting and challenging that the kind of WYSIWYG processors we nowadays have.

Admittedly, the writing process was somewhat more cumbersome than even a simple current text editor might afford. But command lines also give something that the more direct approaches do not. Invoking the different portions through commands gave a sense of control and somewhat exotic feel to the writing process.

Another caveat here is that the writing genre here supports the approach I've used. If I needed to more heavily edit the existing text, or mold new ideas, I might find this way a bit too slow. Also, fiction might be a bit cumbersome to write.

Then again, the QL gives an added bonus of absolute focus to the task, which is nowadays easily lost among the clutter of internet browsers, multiple windows and social media. I'm only left with the QL keyboard, nothing else to do but to produce the text. If I need to pre-plan the text, I do it on paper or inside my head. No messing about with stream-of-though within a text editor.

I'm looking forward to experimenting further with the Sinclair QL SuperBASIC to explore what kind of productive areas it might be applied to.

Thursday, 3 April 2014

ZX Sprites

It is a truth universally acknowledged, that as the ZX Spectrum does not have hardware sprites, the programmer is left to concoct her own bitmap graphics routines. It's something every aspiring Spectrum coder should try to do!

Recently me and Marq have been exploring fast and smooth sprite graphics on the 48k Speccy. It's a much discussed topic, yet remains fascinating. Moving graphics can be done in so many ways, and it is not always obvious what to aim for. Games use various tricks to ease the load, and the tricks in turn depend much on what the game is about.


It's still wise to try to build a generally useful sprite engine, before optimizing for different contexts. So far we have managed eight 16x16 masked, freely positioned, flicker-free, smoothly moving sprites, as shown in the above video. (Check also this Youtube video

This first part opens up the basics of the topic. If I get to write an improved version, there will be a Part II.


A 16 x 16 sprite is a common starting point. Any problems related to it can be applied to larger sprites. The above image shows a 32-byte definition of such a sprite. From left to right, top to bottom, the bits would translate to following decimal bytes:

7,224,24,24,32,4,78,2,95,2,159,1,142,1,128,1,128,1,128,1,128,25,64,58,64,50,32,4,24,24,7,224

This corresponds to the way the Spectrum stores pixels, one bit per pixel, a byte for eight pixels. The memory-mapped screen is found from the address 16384 onwards. A POKE 16384,255 in BASIC will quickly show this. 

Screen BASICs

The ZX Spectrum display is notoriously a bit disordered, so one of the first issues is to resolve the drawing order. At first glance, it would seem to be enough to increment the drawing address with one byte for each column and 256 bytes for each row. Then, a routine like the one below would render our sprite on screen:

5 REM DOES NOT WORK 
10 LET ADD=17184
20 FOR B=0 TO 15
30 READ L
40 READ R
50 POKE ADD,L 
60 POKE ADD+1,R
70 LET ADD=ADD+256
80 NEXT B 
100 DATA 7,224,24,24,32,4,78,2
110 DATA 95,2,159,1,142,1,128,1
120 DATA 128,1,128,1,128,25,64,58
100 DATA 64,50,32,4,24,24,7,224

If only:

Uh oh.
But we're on right track somehow. At least something is happening on screen. As it stands, the address logic changes after every eighth pixel row, as shown in the diagram below. The picture shows in detail the structure of the top left corner of the Spectrum screen, where I tried to draw my sprite. Inside the character row, each pixel row is nicely 256 bytes apart, but the first addresses of each character row are 32 bytes apart.


Furthermore, the screen is divided into three 64-pixel high "slices", each having a start address 2048 bytes apart. Zooming out, the leftmost screen addresses for each character row (every eighth pixel row) are laid out as follows:


This ordering is quite good for drawing 8x8 characters aligned to the character rows. One might even call the Spectrum screen layout a pseudo-character display. But a generic sprite routine has to negotiate the 8-line "boundaries" as well as the two "slice" boundaries. 

The BASIC program below identifies the slice block and character rows for a given vertical pixel coordinate, and draws the "sprite" accordingly.

10 FOR S=0 TO 15
20 LET Y=11+S
30 LET BLOCK=INT (Y/64)
40 LET CROW=INT (Y/8)
50 LET YR=Y-(CROW*8)
60 LET CROW=CROW-(BLOCK*8)
70 LET ADD=16384+BLOCK*2048+CROW*32+YR*256
80 READ L: READ R
90 POKE ADD,L: POKE ADD+1,R
100 NEXT S
110 DATA 7,224,24,24,32,4,78,2
120 DATA 95,2,159,1,142,1,128,1
130 DATA 128,1,128,1,128,25,64,58
140 DATA 64,50,32,4,24,24,7,224

OK, indeed
The object described here hardly deserves the name "sprite". BASIC is simply too slow, and there's lot more to do than just laying the bits on screen. Proper sprite routines can only really be done in machine code.

Even then, it's possible to improve the above listing, by calculating the addresses beforehand into a table. It would be a bit silly to calculate the address for each sprite row.

10 REM PREPARE A TABLE
20 DIM A(176)
30 FOR Y=0 TO 175
40 LET BLOCK=INT (Y/64)
50 LET CROW=INT (Y/8)
60 LET YR=Y-(CROW*8)
70 LET CROW=CROW-(BLOCK*8)
80 LET ADD=16384+BLOCK*2048+CROW*32+YR*256
90 LET A(Y+1)=ADD
100 NEXT Y
110 REM DRAW THE SPRITE
120 RESTORE 180
130 FOR I=0 TO 15
140 READ L:READ R
150 POKE A(11+N),L: POKE A(11+N)+1,R
160 NEXT I
170 DATA 7,224,24,24,32,4,78,2
180 DATA 95,2,159,1,142,1,128,1
190 DATA 128,1,128,1,128,25,64,58
200 DATA 64,50,32,4,24,24,7,224

At least in this respect, writing sprite routines in assembler is not that different. It's about finding ways to offload the burden from the drawing parts. This is why many fast routines use a buffered drawing of some sort.

Sprite shifting

The BASIC listings simplified many things. Much has been said about the vertical coordinates. How about the horizontal? Fiddling with the BASIC listings above would show that adding one to the sprite position address moves the sprite one character column to the right. This at least is straightforward, but it is not smooth. There are ways to recalculate the sprite graphics on the fly, but pre-shifted sprites are easier and faster.

A 16x16 sprite GFX and its' mask, with room for shifting.
Shifted 16x16 sprites are in reality 24x16 sprites, and each graphic needs 8 shifted variants. This way they can be aligned horizontally with the character columns. The downside is that it takes more memory. 

All the sprite variants also need a mask, which is an inversion of the area that will be cleared before drawing the proper sprite. This way the sprites can be drawn over a background without showing any of the pixel background through the sprite, or producing other ill effects. Many games get away without using masks or backgrounds, and can even look better for it (think Dan Dare), but such an approach is hardly generic.

The machine code routines discussed below use shifted sprites.


Sprites in z80 machine code

Smooth sprite movement has to be tied to the screen update cycle, which is refreshed 50/60 times a second. In machine code, the HALT instruction tells the processor to wait until the refreshing beam has returned to the top of the screen.

After this, the beam travels right, returns to the left side of the screen and travels down, refreshing the screen during the process. To avoid flickering and glitches, changes to the screen should be done before the beam hits the drawing area.

So, a conventional sprite-drawing program might follow this order:

The z80 running at 3.5mhz can do quite a bit before the beam is arrives at the pixel area. (Or "the display file" as it is called in the official Spectrum manuals.)

Of course, even when the beam is in the pixel area, things can be drawn below the current beam position, and the results will still be smooth. Many scene demo effects take advantage of "racing the beam" in this way. Even a sprite routine may benefit from such a scheme, but for a generic routine the drawing is safest to do before the beam arrives at the pixel area.


The sprite program shown in the video follows the order below. The border colours are not just for fun, but for showing what actions are being taken at that scanline position. The routine draws the sprites into a hidden buffer screen, and uses a fast copy routine to do bring them on the visible screen. An address table holds the position information for the fast copy routine.

BEFORE THE LOOP:
  • Copy the entire background image to the entire buffer
  • Draw sprites to buffer and create a new address table for them
LOOP PHASES:
  1. Wait Vertical Blank (=HALT instruction)
  2. RED:   Copy bytes to screen from buffer, using the sprite address table
  3. BLUE:  Copy background to sprite positions at the buffer, using the sprite address table
  4. YELLOW:Change sprite coordinates
  5. BLUE:  Store the address table
  6. YELLOW:Draw sprites to buffer and create a new address table for them
  7. BLACK: Wait until the beam is outside the pixel area (estimated)
  8. RED:   Copy background to sprite positions on the screen, using the stored address table
The sprites are drawn when the beam is on its "way in" to the pixel area, and wiped out on the way out. It is a bit unelegant to have to wait at the end, as the waiting time depends on the computer speed. So, this solution is fixed for the original 48k Spectrum timing.

Note that here the sprites are drawn well before the beam arrives at the pixel area. The fast copy routine could even move 12 sprites to the screen. Yet drawing more than 8 sprites altogether (buffer, clearing) is not yet possible. It's easy to see though, that there are ways to reduce the load, especially the needless duplicating of the address table.

Buffered drawing

In this sprite routine, there are three "screens": The real display screen, a source background image and the drawing buffer. In addition, the sprite graphics need to be stored somewhere. 

The diagram below shows the Phase 6 in the above list. (The second "yellow" portion.) Here we draw the sprite to the invisible buffer screen and store its screen position as an address into the sprite address table for later copying.

The actions required for drawing a single byte are highlighted. The diagram only shows the part relevant for the sprite, which in this case is drawn to the top left corner of the buffer, waiting to be moved on the same relative screen position. The mask and graphics are interleaved for purposes which is explained later.

Phase 6: The diagram illustrates how the sprite is drawn into the buffer screen.
Each time the sprites are drawn to the buffer, an address table is also renewed. The address table is at the heart of the fast drawing routine (phase 2). One sprite has 16 rows, so drawing a sprite to the buffer also writes 16 addresses to the table. The address table points to the locations in the drawing buffer, from which the sprites are copied after the HALT:

Phase 2. Fast copy from the buffer to the screen
This means a lot of the calculations needed for computing the outcome (such as the row boundary calculations and combining the mask/background) are done in hiding, whereas the fast copy is only concerned with moving bytes directly between the buffers and screen areas. 

In z80 assembler, the fast copy might look something like this:

buffercopy:
ld sp,#addresstable
pop hl ; row 1
ld d,h
ld e,l
res 7,d
ldi
ldi
ldi
pop hl ; row 2
ld d,h
ld e,l
res 7,d
ldi
ldi
ldi
pop hl ; row 3
ld d,h
ld e,l
res 7,d
ldi
ldi
ldi


...
...
...
[16 rows for each sprite]

addresstable:
; Just an example, a sprite in the top left corner
.dw #0XC000,#0XC100,#0XC200,#0XC300,#0XC400,#0XC500,#0XC600,#0XC700
.dw #0XC020,#0XC120,#0XC220,#0XC320,#0XC420,#0XC520,#0XC620,#0XC720


The stack pointer is placed at the beginning of the table, and the addresses are loaded in the HL register using POP HL, which also increments the stack pointer by two. The LDI performs the equivalent of LD (DE),(HL), moving the contents from address at HL to the address at DL, incrementing both DE and HL in the process. For 24-pixel wide sprites, three LDIs are required for one row.

The table could have from-to address pairs, but writing both addresses during buffer drawing proved to be a bit cumbersome. So the "destination" address DE is constructed out of the "from" address HL by altering the high byte. This is a tiny bit slower than POP:ing both from the table, but it also keeps the table shorter for copying purposes. (phase 5)

This address shifting also means the buffer locations cannot be freely chosen. 0XC000 (49152) and the screen address 0X4000 (16384) are in a good relation to each other, as only one bit needs to be changed between them. There are three versions of the above routine, all different depending whether it is about BUFFER->SCREEN, BACKGROUND->BUFFER or BACKGROUND->SCREEN copying. 

The lines

Let's get back to where we started: The ZX Spectrum screen order. Despite the fast copying routines, the sprites need to be drawn into the buffer, and at least somewhere during the process, the line order needs to be negotiated. It's no good if the buffer drawing routines, even if hidden, are too slow.

The overall assembler source is a bit too daunting to publish here, as it is largely a Processing-generated bundle of tables and repetitive code, held together with some C. So I'll stick to explaining the overall idea and some of the more interesting points.

Obviously there has to be a table that contains the drawing address for each vertical pixel row. But accessing this table 16 times each time a sprite is drawn would be less than optimal. This can be avoided. But if one wants to avoid conditional jumps (and one wants to avoid them) there has to be a number of variants of the routine, depending on which pixel row the sprite is drawn to.

With eight sprites, any commands added to the pixel drawing order gets repeated not only 8 times, but 128 times or more! So there's a great incentive to remove slow code from the heart of the buffer drawing.

It would be neat to just have a full sprite drawing routine for each vertical pixel row. This would produce 175x16 copies of the sprite row drawing code, which takes far too much memory. The amount can be reduced: there are only 23 ways how a 16-pixel high sprite drawing might unfold. This would produce "only" 23x16 times the row drawing code. It doesn't sound much but still it's more than 20 kilobytes, a bit too much.

What we did was a bit nasty: self modifying code. One pixel row drawing code is repeated only 39 times. Each variant has it's own labeled entry point. When the sprite drawing is invoked, the program jumps into the relevant entry point, depending on the sprite vertical coordinate. (Yet another table) The diagram below describes the whole code portion and an example case:


The example sprite is to be drawn at Y coordinate 20. A vertical address table tells that this row uses the variant 4. The NOP (0x00) instruction at the address of EXIT4: label is overwritten with a RET (0xC9) instruction. HL is loaded with the label ENTRY4: address. JMP (HL) takes the program counter there.

The routine then draws four rows, skips the character boundary, draws another eight rows, skips another character boundary, draws four more rows and exits the drawing routine. The RET is overwritten with a NOP.

There have to be rewritten exit points, because only 16 rows are needed, and we want to avoid conditional jumps and wasting registers on counters. So, drawing sprite variant 0 means jumping to the entry label 0, while writing a RET to the EXIT0:. Jumping to entry 4 means writing a RET to the exit point 4 and so on.

The code below describes what happens within the "draw row" portion in the above diagram.


; stack is pointed to the beginning of sprite graphics
; (mask and gfx interleaved)
; de holds the drawing address
; jp(hl) brings the program counter here
; bc holds the beginning of the address table

ENTRY0:

; de is written to the address table

      ld a,e      
      ld (bc),a
      inc bc
      ld a,d
      ld (bc),a
      inc bc

; draw one sprite row to the buffer (3 bytes wide)
; stack handily gives both the mask and the graphic byte

      ld a,(de)  ;get buffer byte
      pop hl     ;get mask and gfx
      and a,l
      or a,h
      ld (de),a  ;draw to buffer
      inc e      ;right

      ld a,(de)  ;get buffer byte
      pop hl     ;get mask and gfx
      and a,l
      or a,h
      ld (de),a  ;draw to buffer
      inc e      ;right

      ld a,(de)  ;get buffer byte
      pop hl     ;get mask and gfx
      and a,l
      or a,h
      ld (de),a  ;draw to buffer

EXIT0:
      nop        ; may be overwritten with ret

After the pixel row, the destination address is adjusted for the next pixel row.

; normal
      dec e      ;left
      dec e      ;left
      inc d      ;down

If the next address crosses the character row, this will be used instead:

; pass the character row boundary
      ld a,e
      add a,#30
      ld e,a
      ld a,d
      sub a,#7
      ld d,a


Or, finally, if the next pixel row is beyond the slice block boundary, this is needed:

; pass the slice block boundary
      inc d
      ld a,e
      add a,#30
      ld e,a


That's it for the time being. We think this routine can still be significantly improved. Perhaps the nasty self-writing can be avoided. Perhaps it might be possible to get rid of the un-elegant wipe at the end of the screen. There are some wild ideas brewing, but better not boast about them before they are real...


SDCC Small Device C Compiler. http://sdcc.sourceforge.net/
FUSE The Free Unix Spectrum Emulator. http://fuse-emulator.sourceforge.net/

Smith, Chris. (2010) The ZX Spectrum ULA: How to design a microcomputer. ZX Design and media.
Smith, Derek M. (2004) Sprite Graphics Tutorial. Accessed from www.bobs-stuff.co.uk
Vickers, Steven (1982) ZX Spectrum BASIC programming. Sinclair research.
Zaks, Rodnay (1982) Programming the Z80. Third revised edition. Sybex.