Showing posts with label korg. Show all posts

Wednesday, 16 November 2022

Korg Nu:Tekt NTS-1 ma:SSaKred

128mm wide, 78mm deep, 17mm high (excluding controls)

I got this about 100€ tiny brick of a synth, Korg NTS-1, or Nu:tekt. You build the case yourself and it has that rugged circuit board aesthetic. There's also promises of customization, both in hardware and software.

So, is this the Arduino of synths? Well, yes and no.

Yes, because it can be modified, and there are pins for accessing inputs and outputs. Yes, because it is very tiny. No, because the software architecture uses uploaded modules and it is not as "open" as an Arduino is. Yes, because you can also compile your own modules. No, because there's not a huge row of pins to access every meaningful aspect of the synth.

NTS-1 is not unique, there are several build-yourself-a-synth models around. The self-building aspect is at least partly a gimmick. But it's a nice product idea, potentially bringing the cost down a little. NTS-1 was really simple to put together with the instructions, no soldering or extra tools were needed. I used a somewhat larger screwdriver than the one supplied.

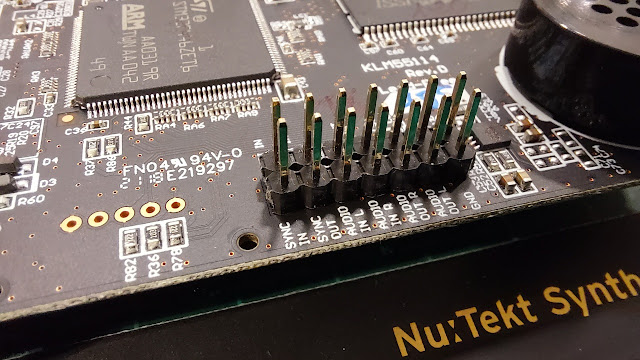
There are a few pins and soldering points that can be used to expand the synth. MIDI, audio and the sync clock are present both as ports and on-board connections. The real changes to the sounds and functionalities are done through uploading different modules.

I had somehow thought I could also use Nu:tekt as a MIDI-controlled adjustable filter, something you don't see that often. To my disappointment the audio-in is diverted to after the filter, and you can only select whether you want mod/delay/reverb affect your audio input.

But this is not the end. It is possible to upload new oscillators, modulators, delays and reverbs via the Librarian app. So I could add third party filters from DirtBoxSynth just to fix my grievance. This added some ~€10 to the cost of this device. Whether these filters are as good as the fixed ones, I can't vouch for.

The Librarian app

I also learned the architecture is shared between Korg Prologue and Minilogue, which means there's a wider market for these modules. Not all modules might be applicable for the context of NTS-1.

The Librarian app is only available for Mac and Windows, but fortunately it worked well in my 2012 Mac. A glance at the coding side makes me feel it wouldn't be impossible to compile my own effect (there are tutorials and examples) but it's doubtful I can do the math for anything useful.

Apparently an imported module only fits a particular category, so you cannot upload "bitcrusher" to Delays or Reverbs, it has to go to Mods. If so, I cannot choose to chain the DirtBoxSynth filters with the bitcrusher, it's either/or, because both go to Mods.

Ok, let's look at the more physical side of things.

The headphone is at the other side

The boards and the elements are meant for constructing the default box, so it's not a set of legos. Still, the process is nearly reversible and you are not stuck with the box you built. It should be easy to remove one of the four 1mm side panels, and replace them with your own, for example.

About that "nearly reversible". Because the instructions said so, I cut off the four screw holders from the board corners. As far as I see now they do not need to be removed when making the standard case. So, be aware when building the case you are making a permanent change! 

The controls are integrated to the top panel, which doesn't look too simple. The ribbon keyboard input connector looks a little tricky, attaching an alternative keyboard is probably not going through that route. Either find out what the pins between the top/bottom do, or use MIDI.

Header pins and four screws keep to cover in place.

The NTS-1 has no patch storage, but this is a minor inconvenience, considering all parameters can be transmitted via MIDI Control Change messages. There are Oscillator, Filter and Envelope types, with A and B parameters for each. On top of that you can have Mod, Delay, Reverb, LFO and Tremolo. There is also a rather full-featured Arpeggiator.

Like all the audio and sync ports, the MIDI port is 3,5mm one, with tip-ring-sleeve arrangement. So one of the first customization decisions might be whether you need an adapter cable (be aware of Type A and Type B) or build your own full-size MIDI port using the solder points inside. This is what I did, not long after putting the thing together.

The USB also connects the device to your computer as a visible MIDI device, so whether you even want to use the MIDI port for connecting is up to you.

Adding the full-size MIDI port

The box was even easier to open than to put together. The front or the rear panel needs to be removed before the circuit board can be lifted out.

After removing the board it is easy to access the through-holes for MIDI, AUDIO and SYNC. Note that 5v and 3.3v can be drawn from here too.


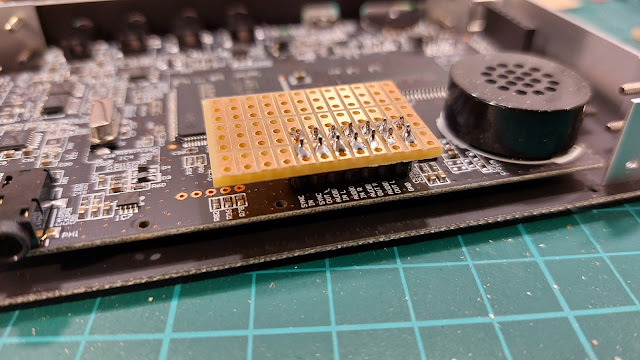
I soldered in a header strip for testing. Then I realized the jumper cable heads would not fit under the cover, so I instead added a tiny layer of prototyping board. A ribbon connector might have been helpful here.

This way I can solder/de-solder wires should I need to change them. I wouldn't want to heat the actual Nu:Tekt board too many times.

The MIDI in "tip", "ring" and GND("Sleeve") need to be connected to a MIDI DIN-style connector.

I soldered the wires on the proto pads, as it was too tricky to nudge them from the underside after the board had been fit to place. There's one more layer of that header strip keeping the board higher.

I could have soldered the wires beforehand from the more correct direction, though.

Internally, MIDI channels are 0-15, in hex 0-F, whereas software and documentation refers to them as 1-16. This discrepancy sometimes rears its head and creates confusion, but I've become used to it.

How to change the MIDI channel? Consult the manual. Plug in the Korg and press REVERB at the same time, you get to the parameter menu. Find the parameter CHL with the Type knob and change them using the B knob. Push ARP to store the parameter to the internal memory.


Sunday, 18 April 2021

Korg Volca SysEx


The Korg Volca FM (2016) is a neat tiny remake of a Yamaha DX7 (1983) digital FM synthesizer.

The cheapness does come with some strange omissions, and the most astounding is that it doesn't understand the MIDI Program Change signal.

Also, editing the sounds fully on the Volca is not really possible. The knobs cleverly access multiple operators and the overall algorithm through a few knobs. (Edit: Actually there is a way to edit the parameters and it's not too bad.)

One selling point of the Volca is that as it's a DX7 clone, it can load DX7 patches, i.e. programs/voice data. As the Volca can receive a single-voice patch, I thought I could simply send the whole instrument data at once, and ignore the lack of Program Change messages.

This model also means the Volca can interpret all the original DX7 parameters, such as the meticulous editing of 6 separate operators, Feedback, Pitch envelope and LFO. It's just all under the hood, as the parameters are not accessible with MIDI Control Change messages.

There's an unofficial firmware update that expands the Volca capabilities in these respects, but I wanted to avoid that route as yet.

Sending SysEx

I used to think System Exclusive packets were something arcane, possibly because I didn't get them to work reliably with an Atari ST and a BASIC in the 1990s, having very little information at hand.

With better hardware and better drivers, plus all manuals and information on the Internet you could hope for, it's much more easy to experiment. It's simplicity in itself, a number of 7-bit bytes are bookended by $F0 and $F7 bytes.

Volca doesn't have MIDI out so I couldn't just sniff the contents of the SysEx package.

The device can send/receive patches using audio(!) and for a moment I thought I'd examine that format as I did with the Panasonic JR-200 tape format those long short years ago.

However, the Volca SysEx patch is well documented and there's a lot of DX7 material around on the web so I felt I should be able to pull this off without going to extremes.

Almost 100% of all Yamaha DX7 patches on the internet are in the 32-patch (4kbytes) format, whereas I'm far more interested in the single-voice (156-byte) format.

Even MIDI can easily send that much data in an eyeblink, so although I don't expect real-time editing of the voice it should be comfortable. 4Kbytes wouldn't be that slow either, as MIDI moves stuff by 31250 bits per second, with a stop bit that becomes 3125 bytes per second I'm told.

Just to give a further idea of the speed, MIDI moves roughly 52 bytes during a frame if I'm working on 60fps screen (Not that MIDI has anything to with the screen sync)  It's not a huge amount when presented like this!

Well, after a few misunderstandings and typos I could send the SysEx dump to Volca, proven by having the text display show my instrument name. By the way Volca only shows 8 characters of the 10, which can be annoying when making a disction between Trombone1 and Trombone2 and so on...

It says MyPatch1, not NyPatchI!

SysEx is initiated by sending $F0 over MIDI, and terminated with $F7. As MIDI data contents tend to be 7-bit, the data within a SysEx dump is within 0-127 range ($00-$7F).

$F0 - Exclusive status
$43 - YAMAHA ID
$00 - Global MIDI Channel (Device)
$00 - Format Number (1-voice as opposed to 32-voice)
$01 - Byte Count MSB (1=128)
$18 - Byte Count LSB (128+

... data

$F7 - End of Exclusive

I was worried that the Global MIDI channel (Device) does not really do anything. If I had two Korg Volcas in my MIDI chain, there's no software way to differentiate between the two and they would both receive the same data. So a setup with multiple Volcas wouldn't work with this approach, unless I had separate MIDI buses for different MIDI interfaces.

Well, as I don't have multiple Volcas, the remaining real problem was to decipher the patch data as something meaningful, and I didn't undertand the DX7 patch structure that well. (I used to have a Yamaha DX11 instead.)

Using Processing/Java and midibus library, the below sends a bare Sysex, excluding all the program setup and given that "output" is an already set midi bus.

I've colorized the areas to correspond with the comment lines.


Some notes on the patch structure

A human-readable DX7 patch sheet might say Frequency Coarse 1.0 and Frequency Fine 0.0, but would not tell which bytes would represent such information. In turn the Volca MIDI specification says that Coarse frequency can be described with 0-31 and Frequency Fine is 0-99, but not tell the relation to the frequency. 

I couldn't find a full "Rosetta Stone" that would solve all this, but at least the source to this DX editor  served as a starting point. Here I could already see that Keyboard Level Scale values 0-3 correspond to -LIN, -EXP, +EXP and +LIN and the oscillator mode is R/F, pointing to Frequency Ratio and Fixed Frequency.

It's worth to note that the six Operators are "upside down" in the SysEx bank, starting from 6 and ending with 1.

So, I'm onto something here, and the original DX7 manual was also helpful here.

The FM synthesis is based on the idea that an oscillator frequency is modulated with another oscillator. If you first modulate the frequency of one oscillator and then in turn use this to modulate the frequency of another, you can get quite complex sounds. There's a feedback in the algorithm too, which often provides that 'raspy' or 'crunchy' digital DX sound.

The way the 6 operators interact with each other depends on the overall Algorithm (0-31). The algorithm decides which of the operators are carriers and which are modulators. If you can't see how the algorithm is built, then editing the sound is quite pointless. The Volca of course bypasses this rather neatly.

For example, algorithm 4(of 31) means that Operators 1,3,5 are carrier (sound-generator) operators, and 2,4,6 act as modulators for the respective carriers. (6 also feeds back into itself).

Algorithms 1 and 21 (#0 and #20)

You have to refer to the algorithm chart of the DX7 or Volca, bearing in mind these are often numbered 1-32 whereas the MIDI data is 0-31. Roughly, these start from algorithms where all operators feed into each other in turn, ending with algorithms where all or most operators are parallel carriers.

Operators can feed a proportional frequency or a fixed tone. It's usually better to start from having all operators in Proportional Ratio mode.

Frequency Coarse in Ratio mode:

0 = 0.50 Hz
1 = 1.0
2 = 2.0
3 = 3.0

...

29 = 29.0 Hz
30 = 30.0 Hz
31 = 31.0 Hz

Frequency Fine (0-99) complements Coarse so that Frequency Ratio is

Coarse Freq * (1+F*0.1)

where F is the 0-99 setting.

... meaning that 0 = 0.50 * 1.99 would be 0.995hz and 1 = 1.00 * 1.99 would be 1.99Hz obviously.

It's a good idea to start with carriers that have 1 = 1.0 and modulators not too far off either. Voices easily become weird if you mess with disproportionate carriers.

Detune can add some "life" to a sound, ranging from -7 to 7 and the effect depends also on whether the operator is a carrier or a modulator.

0  = -7
1  = -6
2  = -5
3  = -4
4  = -3
5  = -2
6  = -1
7  = 0
8  = +1
9  = +2
10 = +3 
11 = +4
12 = +5
13 = +6
14 = +7

Each operator has an amplitude (volume) envelope, and these have 4 rate values and 4 level values. Instead of single decay there are two. This makes for 6*8 parameters for envelopes alone!

The scaling of these envelopes is too much to go into here now, just remember rate values are "inverse", smaller the rate longer it will take.

Rate Scaling means the envelope will be played faster in proportion to the note pitch, so if this is 7 the envelope part of the operator will be fast in any case.

When forming a sound it might be useful to first set all the attacks to 99 and all levels to 99 for all carriers, and then start reducing the effect of the different operators.

The velocity sensitivity (0-7) part is important, as this adds expressivity to a sound. Setting them all to 0 means all operators are indifferent to velocity change, which might be a good starting point. (Keeping in mind that operators also have levels).

Subtly adding values to some of the operators means that the proportion of the action taken by the operators on the sound will depend on the velocity. Bear in mind the "velocity" slider on Volca is not an overall "amplitude" but rather feeds in this 0-127 velocity value. 

The velocity data that comes in with notes does not affect this velocity. After the voice has been triggered, changing the velocity CC (41 decimal) does not change the sound already being played.

It's all so much clearer now! (sarcasm)

The verdict

As only 156 bytes are sent, I could send this individual voice data about 15 times a second without observing any kind of buffer build-up.

There's a chance the SysEx dump could even be used as a kind of in-song sound manipulator depending on where and how often notes are played. But it's probably much better idea to create sounds that are responsive to velocity and only send the SysEx patch at the beginning of a song.

Both in theory and in practice, the lack of Program Change interpretation can be bypassed using the SysEx. The practical issue remains of building a library of sensible patches to send... So I need to decipher the 32-voice banks after all.

Sunday, 18 November 2012

Spectrum 128 and MIDI


Information on MIDI and the ZX Spectrum is available on the net but it is a bit more scarce than one might think. So I'll try to collect some of the useful things here and also fool around with Spectrum and MIDI.

The RS232/MIDI port on the back of the Spectrum is not a standard MIDI port, obviously. But making it work is not a matter of simply rewiring the port, as it needs a few resistors and a transistor. Also, a somewhat obscure plug is needed if one does not wish to build the cable directly into the Spectrum.

Pictured, a BT-like plug and a DIN-8 connector, which passes for a MIDI port.
The plug at least looks like a BT cable, 631A, with all the six pins. The plastic parts may need some changes before it fits the Spectrum port. For the MIDI connector, I used an 8-pin DIN, which has more pins than a MIDI port requires, but as long as there are holes in the correct place it does not matter. My MIDI connector is built according to a document by Ben Versteeg at benophetinternet.nl/hobby. Direct link to the document is here.

The white cable is connected to the RS232/MIDI port. Yes, it looks a bit messy now.

Programming MIDI via BASIC

Try as I did, I could not really find a proper MIDI sequencer for the Spectrum. I suppose around 1986 onward nobody in UK did little else than games for the Spectrum. Possibly the russians have made something for their Pentagons and Scorpions, but they might not work on a vanilla machine.

Fortunately, BASIC offers a simple way to test the port in action. The Sinclair Spectrum 128k introductory manual describes all the commands. Perfectly timed sequences can be built out of text strings. As the Spectrum BASIC allows fairly flexible string manipulation, tunes can be structured programmatically. The single PLAY command then initiates the whole multi-channel sequence.

The pseudo-full screen BASIC editor in 128 Spectrum.
Something like this was used to create the loop in the video above.
 
The example below should be valid in 128 BASIC:

10 LET a$="T120Y1M1O3N((1e1e1e1e1e1e1e1e))"
20 LET b$="T120Y1M1O3N((1c1&1&1&1&2&1&1&))"
30 PLAY a$,b$

The example plays notes simultaneusly on two channels. T sets the tempo at 120BPM. Y is the important command here, as Y1 selects the MIDI output channel #1.

The actual tune is controlled by the codes within the character strings. Lower case letters cdefgab play the notes on the octave, whereas upper case letters CDEFGAB play notes on a higher octave. The & denotes a rest. The notes are preceded by a number (1-9) that defines their length. Using a # indicates a sharp note. The brackets are used to repeat a section, and this can be done to up to four levels. Here I'm looping the contents four times.

M selects the channel (not needed for MIDI I think). O1 sets the octave at the second lowest octave. N is used to separate numbers from each other. It seems to be a good practice to insert it at least between the setup and the notes. Z apparently would send out raw MIDI data, but I'll see about that one later.

A 32-step sequencer with two channels.
It's fairly easy to sketch out graphical ways for creating sequences. as the data can always be "compiled" into the strings and played. However, in BASIC these things are notoriously slow. One thing to avoid is trying to build loops or song structures with GOTO commands. It just won't work. It's better to append the whole song into the character strings and use a single PLAY statement.

To be continued...

The Spectrum connected to a KORG Electribe sampler.