 |
| 128mm wide, 78mm deep, 17mm high (excluding controls) |
I got this about 100€ tiny brick of a synth, Korg NTS-1, or Nu:tekt. You build the case yourself and it has that rugged circuit board aesthetic. There's also promises of customization, both in hardware and software.
So, is this the Arduino of synths? Well, yes and no.
Yes, because it can be modified, and there are pins for accessing inputs and outputs. Yes, because it is very tiny. No, because the software architecture uses uploaded modules and it is not as "open" as an Arduino is. Yes, because you can also compile your own modules. No, because there's not a huge row of pins to access every meaningful aspect of the synth.
NTS-1 is not unique, there are several build-yourself-a-synth models around. The self-building aspect is at least partly a gimmick. But it's a nice product idea, potentially bringing the cost down a little. NTS-1 was really simple to put together with the instructions, no soldering or extra tools were needed. I used a somewhat larger screwdriver than the one supplied.
There are a few pins and soldering points that can be used to expand the synth. MIDI, audio and the sync clock are present both as ports and on-board connections. The real changes to the sounds and functionalities are done through uploading different modules.
I had somehow thought I could also use Nu:tekt as a MIDI-controlled adjustable filter, something you don't see that often. To my disappointment the audio-in is diverted to after the filter, and you can only select whether you want mod/delay/reverb affect your audio input.
But this is not the end. It is possible to upload new oscillators, modulators, delays and reverbs via the Librarian app. So I could add third party filters from DirtBoxSynth just to fix my grievance. This added some ~€10 to the cost of this device. Whether these filters are as good as the fixed ones, I can't vouch for.
 |
| The Librarian app |
I also learned the architecture is shared between Korg Prologue and Minilogue, which means there's a wider market for these modules. Not all modules might be applicable for the context of NTS-1.
The Librarian app is only available for Mac and Windows, but fortunately it worked well in my 2012 Mac. A glance at the coding side makes me feel it wouldn't be impossible to compile my own effect (there are tutorials and examples) but it's doubtful I can do the math for anything useful.
Apparently an imported module only fits a particular category, so you cannot upload "bitcrusher" to Delays or Reverbs, it has to go to Mods. If so, I cannot choose to chain the DirtBoxSynth filters with the bitcrusher, it's either/or, because both go to Mods.
Ok, let's look at the more physical side of things.
 |
| The headphone is at the other side |
The boards and the elements are meant for constructing the default box, so it's not a set of legos. Still, the process is nearly reversible and you are not stuck with the box you built. It should be easy to remove one of the four 1mm side panels, and replace them with your own, for example.
About that "nearly reversible". Because the instructions said so, I cut off the four screw holders from the board corners. As far as I see now they do not need to be removed when making the standard case. So, be aware when building the case you are making a permanent change!
The controls are integrated to the top panel, which doesn't look too simple. The ribbon keyboard input connector looks a little tricky, attaching an alternative keyboard is probably not going through that route. Either find out what the pins between the top/bottom do, or use MIDI.
 |
| Header pins and four screws keep to cover in place. |
The NTS-1 has no patch storage, but this is a minor inconvenience, considering all parameters can be transmitted via MIDI Control Change messages. There are Oscillator, Filter and Envelope types, with A and B parameters for each. On top of that you can have Mod, Delay, Reverb, LFO and Tremolo. There is also a rather full-featured Arpeggiator.
Like all the audio and sync ports, the MIDI port is 3,5mm one, with tip-ring-sleeve arrangement. So one of the first customization decisions might be whether you need an adapter cable (be aware of Type A and Type B) or build your own full-size MIDI port using the solder points inside. This is what I did, not long after putting the thing together.
The USB also connects the device to your computer as a visible MIDI device, so whether you even want to use the MIDI port for connecting is up to you.
Adding the full-size MIDI port
The box was even easier to open than to put together. The front or the rear panel needs to be removed before the circuit board can be lifted out.
After removing the board it is easy to access the through-holes for MIDI, AUDIO and SYNC. Note that 5v and 3.3v can be drawn from here too.
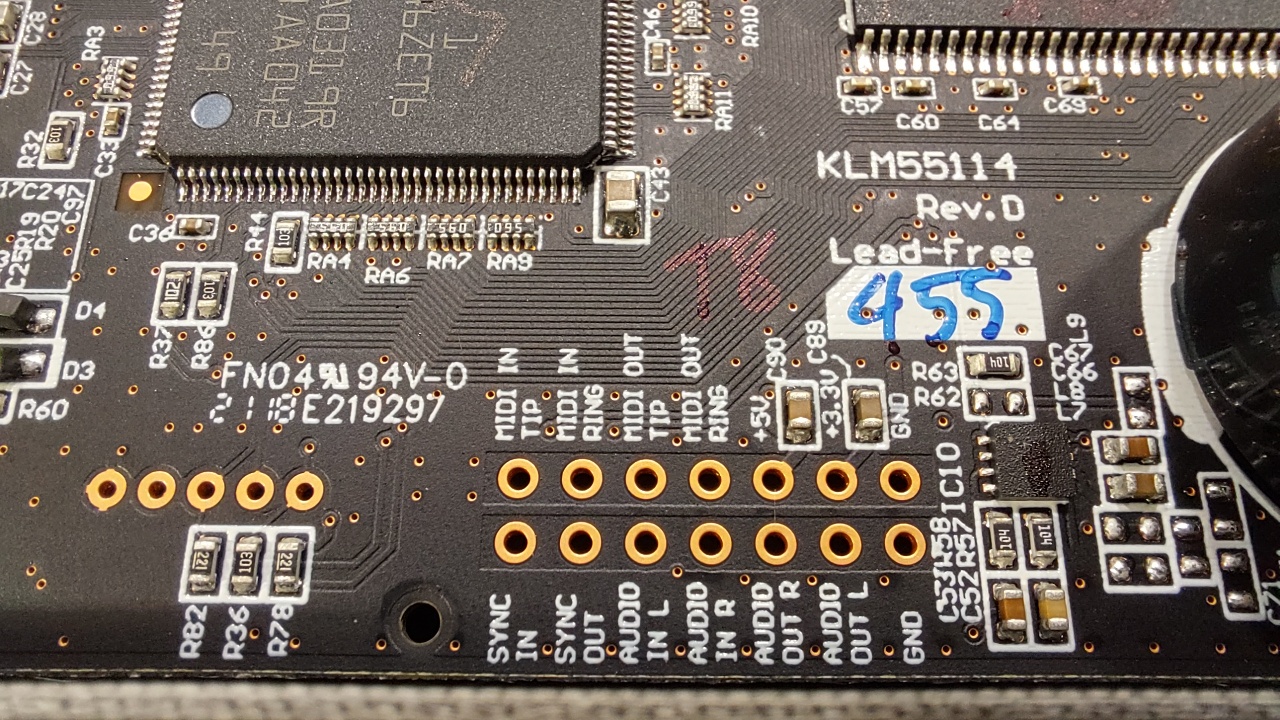
I soldered in a header strip for testing. Then I realized the jumper cable heads would not fit under the cover, so I instead added a tiny layer of prototyping board. A ribbon connector might have been helpful here.
This way I can solder/de-solder wires should I need to change them. I wouldn't want to heat the actual Nu:Tekt board too many times.
The MIDI in "tip", "ring" and GND("Sleeve") need to be connected to a MIDI DIN-style connector.

I soldered the wires on the proto pads, as it was too tricky to nudge them from the underside after the board had been fit to place. There's one more layer of that header strip keeping the board higher.
I could have soldered the wires beforehand from the more correct direction, though.

Internally, MIDI channels are 0-15, in hex 0-F, whereas software and documentation refers to them as 1-16. This discrepancy sometimes rears its head and creates confusion, but I've become used to it.
How to change the MIDI channel? Consult the manual. Plug in the Korg and press REVERB at the same time, you get to the parameter menu. Find the parameter CHL with the Type knob and change them using the B knob. Push ARP to store the parameter to the internal memory.
 |
No comments:
Post a Comment