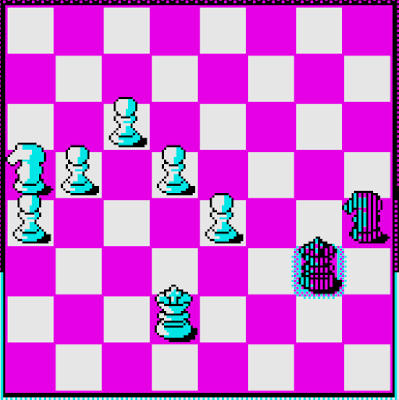
As an addendum to the previous Kilobyte's Gambit post, I explored my copy-cat pawn approach further. At that point I declared I couldn't really guarantee a win with it. Well, neither can I guarantee it now but after 13 consecutive wins I think the system is quite reliable for me.
Warning: This has little to do with real chess playing, it's more about finding exploits in the 1K java chess engine. I'm also looking to win fast and safely.
So, this is the formation I'm looking to establish in the beginning. (I've already started moving the rook)
The following picture shows the alternative position that sometimes happens. It might be just as good, but it happens less often so I have less proof. You'd be looking for a breakthrough at the h-file rather than g-file but otherwise it's not that different.
The starting move is e4. (King's pawn two steps forward) If Beth copies your move from the very beginning, you need to choose which pawn to move. I've found the c3 move to be safe. Then continue copying the moves, seeking to complete the above formation.
If Beth moves the queen to b6, just keep calm and move your pawn to b3, which will be protected. This is usually always followed with a bishop to g4. Just follow up with a pawn to f2 and the bishop will be scared away.
By the way, Stockfish engine at Lichess.org evaluates the pawn formation as even for black and white. The following moves are in no way condoned by Stockfish, but will result in a strong enough position.
I believe it's now useful to put your bishop to h3, after which Beth either exchanges it or you will have to exchange it (which is often better as this usually results in a king move).
If the bishop is not taken future rook moves may be dangerous.
If the bishop is blocked it may help to wiggle a piece back and forth until the exchange becomes available.
Now it's time to pile up your material to the right side, and usually you can take your time as Beth moves pieces around aimlessly behind the wall. This is really the key to winning here as you can exploit the given time in any way you want.
The more you can do at this stage, the better. It's a good idea to keep the rook at h3 protected with the knight, and to have some room to move the queen at the second file in case you need to back up the rook at g.
It's possible a knight may attempt to slip in through b4 or d4, in which case you need to take care and seek to exchange it with a bishop. This sometimes leads to a less secure game.
As there's all the time in the world, the white should also develop a knight near the top, to the d5 square. It's not immediately useful but an opportunity for exchange will usually present itself and it can be crucial for an easy win.
The remaining bishop points to the right edge, backed up by the queen. Then you can move forward with your g-pawn, and begin to advance with your rooks and other pieces, looking to line up your rooks and the queen and exchanging away knights and bishops.
At this point, I have now checked that Stockfish evaluates this (or roughly similar) position quite strong as +3.2, pretty nice considering there's no material difference!
Yet it can be a precarious situation and things can still go wrong. Sometimes a knight or bishop may need to be sacrificed in order to get a good skewer (winning the black queen).
The below shows what could happen. I sacrificed a rook to get in a situation where I wiggled the rook and queen back and forth until I skewered the opponent's queen. Although I only have a queen and a knight against a rook pair it won't be too hard to win.
Breaking the pawn formation in the middle is to be avoided, as your king's defenses are not that good there and the approach really relies in the idea of smuggling your pieces up using the g- and h-files.
If the engine starts to do weird moves such as a pawn breakthrough in the middle, or crazy sacrifices, you'll know it is sensing defeat or massive material loss and simply trying to postpone or compensate it. Take the opportunities as they come.
Exchanging queens is not often the best idea, unless you can win significant amount of material. It's usually better to have the queen and a good position even if it means you have slightly less material.
The above situation is not exactly the best outcome, but something like this can easily happen. Not much of a material advantage to speak of and you have to take care the queen doesn't slip through or take that knight. Here exchanging the queen may be necessary as it would get rid of the danger and help get that pawn at f6, working towards promoting the h-pawn.
Here it lead to endgame with knights and pawns, in which I got rid of the opponent's pawns altogether.
Towards the end, if you can't see a way to directly mate the opponent, be on the lookout for exchanging all pieces this way just to ensure pawn promotion, because Beth is really poor at handling those.
Knights can be dangerous at the end game if you're looking to win fast.
The last thing to take care is to avoid a stalemate, which Beth will try to arrange if possible.
So, although some chess skills are needed to handle some of the more tricky situations, to me it appears the engine is far more easy to win with this approach than with conventional openings.
Maybe I'm finally through with this strangely addictive chess engine :)
https://vole.wtf/kilobytes-gambit/


No comments:
Post a Comment