 |
| Dott me a favour and don't Tier me up |
A few notes after a some more kilometers behind with Zeeclo Fenix. The season has not yet closed in Helsinki, there's no snow on the ground and it's not significantly colder than it was a month ago. If anything, rain and work has prevented me from trying it out more.
I had a 6km and then 13km trip with the fully charged battery, so I'm starting to think it's safe to say 20km is possible. I weigh about 80kg, temperature has been around 5-10 degrees celsius.
I thought I'd not be self-conscious while driving a scooter, being past that after driving the rentals. But I have regressed a little, thinking this might look silly(!) It might help to remove that logo and the "wooden" decorations. The deck part doesn't really even exist in comparable models.
But, first adjustments first.
Handlebar adjustments
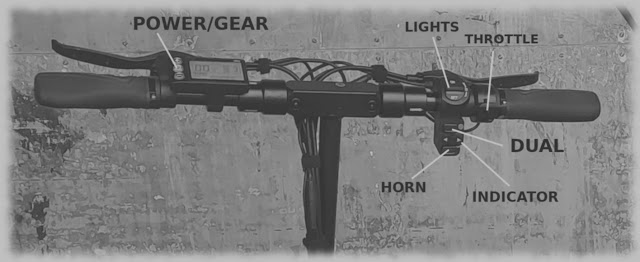
Tinkering was one motive to get this particular model. I had done some basic alterations but was not satisfied with the position of the 2nd motor button.
 |
| The old arrangement |
I moved the button cluster to the left side and the display to the right. Now pressing the dual motor button is done with the left hand and does not conflict with the throttle.
Of course now the 3 different speed modes cannot be as easily accessed but I generally only use the mode 3 anyway. It's also better not to fiddle with the display options while driving.
It's not obvious that three attachments fit on the same side, because to fold the handlebar, the "locks" have to be pulled outwards and the bar needs to have some room for that, about ~1.4cm each side.
 |
| The new arrangement |
About that moving. It would have been easier if both the display and the button block could have been exchanged, but only the display can be removed "upwards". Everything else has to be pulled out via the handlebar ends.
So I had to pull out the rubber handles, levers and the thumb throttle just to exchange the handedness of these two items.
The rubber grips were diabolical. Loosening the screws did not help much, so they are just inched out by rotating them with full-body force. I got a blister but at least no hernia. They went back far more easily.
By the way the included wrenches did not have a size for these grip tightening screws, so I used my own.
Almost needless to say, I liked the new arrangement better. As a further adjustment I rotated the button block so the 2nd motor button is closer to the thumb. (Not done in the above image).
The button is still quite tiny. A future idea might be to have an additional well-placed, "boost" button that simply keeps the 2nd motor on while pressed. There's no complex electronics inside that button block, just switches.
What else?
Another thing I did was to measure the display speedometer against a mobile phone GPS-based speedometer app. This could be done more systematically, but at least it looked that while driving the 25km/h cruise, the app showed the same.
I've occasionally had a feeling the steering is more hungry to turn to left than towards right. It's worth investigating, possibly something to do with the cable lump.
There are many parameters inside the display menu, and I'll get back to those later.
I also need to understand the disc brakes better, and if there are some adjustments to be done there.

No comments:
Post a Comment