Wednesday, 4 September 2019

Atari Falcon serial transfer pt.2: Shells from hell


A continuation of the Atari Falcon/ST file transfer topic.

I've found Atari terminals to be clunky and none would do exactly what I'd want them to. Ansiterm fared the best so far, the terminal is good enough for using the command line remotely, and a Zmodem transfer will be automatically recognized when using sz from Linux end.

However, on the minus side it's one more program to launch, necessitating video mode adjustment to ST-LOW and setting up the xyz.ttp. This also distances you from the Falcon end of things.

Although this was an ok solution for one longer session, I didn't exactly like to access my Linux command line through a terminal.

As long as I can use a command line shell on the Atari end, I should also be able to call up a file via that command line. Previously, this meant launching xyz.ttp at Atari end and then typing the sz at the Linux end.

Now I tried a fun way to improve this.


Mupfel shell

At Falcon end I have used the Mupfel shell, which is bourne-like enough for doing relatively complex scripts and redirecting of input/output.

I could make a small script that sends commands to the Linux by serial port, activating the sz Zmodem transfer and running the xyz.ttp Zmodem receive program at the Atari end.

But it took a while to get the Mupfel shell up and running properly, as I couldn't find that much information about how to use the shell.

Then it struck me that as the shell is a Bourne clone, people must have assumed it's nearly general knowledge anyway. So, after reading some sh guidance...

If the program file mupfel.ttp is at D:\comms\mupfel then the shell expects to find a file called 'profile' from there.

echo Mupfel
echo xyz,zip,lzh,edit,emacs
echo
PS1='%p> '
alias xyz=c:\xyz202b\xyz.ttp
alias zip=c:\stzip\zipjr.ttp
alias lzh=c:\packers\lharc\lharceng.ttp
alias edit=d:\comms\memacs\me311ata.tos
export TERM='VT52'
PATH='c:\;d:\comms\mupfel\bin\;e:\;f:\;.'
HOME='d:\comms\mupfel\'
SUFFIX='prg;app;acc;tos;ttp;mup;sh;'
LINES=30
ROWS=30

The above is an example of my 'profile' which connects various programs with aliases. The line with PS1='%p> ' makes the prompt friendlier, showing the current path.

I use MicroEMACS for editing text files inside Atari, there are not many options for editors that would work well within the Atari shells. If only I'd find the way to bind those arrow-keys...

MicroEMACS requires that the environment parameter TERM is not empty, so I have 'VT52' there. Suffix should tell which files are executable but frankly it doesn't seem to do much. Not sure if LINES/ROWS are meaningful to any programs.

Well, off to the file-transfer-mobile.


The 'get' script at Atari

D:\comms\mupfel\bin\ is a good place to put a script. Mupfel scripts end with .mup extension.

From the command line, doing

echo Hello>>AUX: 

sends characters to the serial.

Saving the following as get.mup

echo get $1 >>AUX:;xyz

is enough to send over a 'command'. The characters 'get ' are sent, followed with the argument passed from the command line, and after that the shell runs xyz.

Here in my case xyz is an alias for xyz=c:\xyz202b\xyz.ttp as defined in the profile above. I guess the 'get' could be an alias too.

I spent some time making a Processing sketch that reads the serial input, sniffed for that 'get' statement and used a system call to send the required file using sz. Clunky but it worked.

However, after a bit of a think I felt this could just as well be done as a Linux bash shell script.


The 'server' script at Linux

At my Linux end, I can use a script somewhat like this:

#!/bin/bash

DEV=/dev/ttyUSB0
stty -F $DEV 57600

echo "Serial is on"
echo "use get at Atari"

while :
do
 echo -n "WAITING>";
 IFS=' ' read COMM ARG < $DEV
 if [ "$COMM" == "get" ]; then
  echo "GET:" $ARG 
  sz $ARG > $DEV < $DEV
 fi
done

The script sets the serial port to 57600 and waits for a line of characters to arrive via the serial.

After such a thing arrives, the string is split using spaces between words. The first part will be the 'command' and the latter part a 'filename' for that command.

If the command is seen to be equal to 'get' then zmodem send (sz) is launched to send the file, with a filename based on the second part of the line received from the serial port.

In the meantime the tiny get.mup script at Atari end ensures that xyz202b.ttp is launched, waiting for the Zmodem transfer.

After the file has been transfered, the Mupfel shell resumes normal operation while the script at Linux end is looping another cycle, waiting for further instructions.

So, typing get /home/user/Downloads/atarifile.zip on the Atari end the file will be received to the current folder.

I added a 'put' command for uploading files from Atari and a 'say' command for simply sending a bunch of characters to be displayed, for testing purposes.

echo put>>AUX:;xyz -u $1

and

echo say $1>>AUX:

and the respective portions to be added to the Linux bash script:

    if [ "$COMM" == "put" ]; then
        echo "PUT:"
        rz > $DEV < $DEV
    fi
    if [ "$COMM" == "say" ]; then
        echo "SAY:" $ARG
    fi


Vice Versa

Now, it might be handy for the Atari to be waiting for the files whereas the typing stuff is done on Linux? How to do the opposite of the above?

Again, in Mupfel:

while :
do
IFS=' ' read COMM ARG <AUX:
if [ $COMM = 'put' ]
then
echo 'RECEIVING'
xyz
fi
if [ $COMM = 'end' ]
then
echo 'QUIT'
exit
fi
done

I had to take a different approach (it's not bash) but in the end I got it working on the Mupfel shell.

(I preserved the command/arguments split although I don't do anything with the arguments really.)

Running this, it becomes possible to use the send commands exclusively from the Linux end and the files will arrive at the folder the script is run from.

I had some trouble breaking out of the loop so I added the 'end' command just to be able to stop the shell from outside.

Also, at least in this form the 'read' tended to take in the Zmodem control characters etc. and got into a mixed state having received bunch of codes but no newline. Sending a bunch of lines after the serial send sort of clears the situation, but also produces glitchy-looking messages.

Although a nice exercise, having the 'server' script at linux end might be the better solution after all. Running that script is no problem for that box, whereas the Atari would be tied with running that one loop.


Afterword

By the way, another Bourne-esque shell I dabbled with for a while is called Okami, which was good enough for launching that xyz.ttp, moving and exctracting files around. A bonus is that it's able to launch GEM programs, something Mupfel won't do.

The earlier version of Okami may be recommended, although it is in some ways lacking. The later versions appear more comprehensive but they were buggy at least on my Falcon so it was virtually useless.

Friday, 23 August 2019

Atari Falcon SD-IDE

The Falcon August continues!

After establishing the basics of file transfer between Falcon and Linux, I wanted to replace the physical hard disk with a IDE-compatible SD card reader. There was one CF-IDE adapter lying around but my CF cards were exactly those "nameless" brand cards people always warn about so I avoided using that.

I ordered a IDE/SD card reader "SECURE DIGITAL 44 PIN 2.5 MALE IDE TO SD CARD ADAPTER AMIGA 600" off eBay. Seeing that it was advertised as fitting for Amiga sounded good enough.

When the item arrived, I thought it wasn't the correct 2,5 inch as "promised", but smaller. But after opening the Falcon (the first time) it turned out this was exactly right for the IDE cable/connector that was inside the computer.

IDE cable at centre. Note the absence of a cradle for HD.
So, I couldn't even have used my CF-IDE adapter without another adapter.

Possibly, a doohickey 90-degree adapter might exist somewhere that would get rid of the cable entirely.

For the SD card I used a Kingston 8gb HC "20x" card.

For setting up the disk I simply followed instructions, and here I'm largely just repeating what people have said elsewhere, mostly the second option in this Youtube video.


Opening the Falcon and fitting the card adapter

The Falcon cover is held together with a bunch of screws. Underneath, there is a metal panel that needs to be removed. The second metal panel (under the keyboard) can be left attached.

The topmost metal part should come off by creatively bending and wiggling it, even if it at first looks like it might not.

This Falcon did not have the original cradle for the hard disk, so I can't really comment about that.


This also meant I'm somewhat out of options as to where to put the card reader. It's so light it could just dangle at the end of the IDE cable, but the danger here is that it might hit something delicate on the motherboard.

I feel that the creators of SD card readers could make the circuit boards a bit larger just to make them easier and safer to attach inside the computer. I mean if it's supposed to replace a 2,5 or 3,5 inch hard drive, it doesn't need to be the size of a postage stamp...

For a while I kept the card like in the image below, but then I felt it might hinder the air flow. Probably not, but anyway it ought to fit more firmly into place.


In the end I turned the cable and the card "upside down" on itself and fastened a wire around the IDE cable so although the adapter isn't screwed or fastened in, it won't sail away on its own accord.


Partitioning the drive

After physically connecting the card reader using the IDE cable, the card needs to be partitioned using the Atari (not formatted).

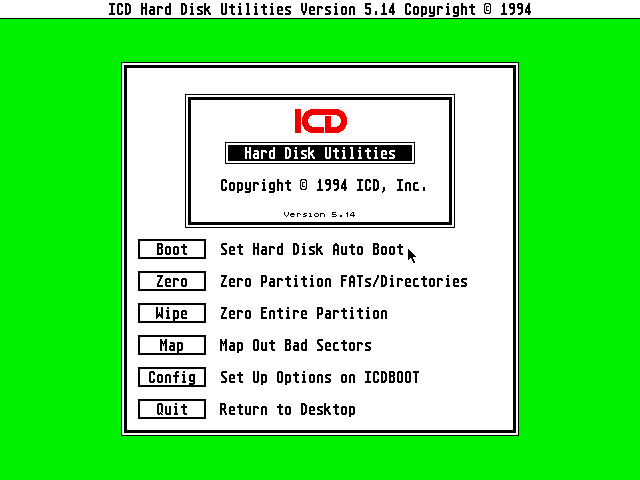
I went for the ICD driver route, as people have reported it should work just fine with the CF cards and like. "Somebody" said SD cards might be more reliable so that's why I went there too.

I downloaded the ICDP655A.ZIP on Linux, likewise unpacked it on Linux and copied the resulting folder to a HD floppy disk that I had formatted on the Falcon.

Using ICDBOOT.PRG the relevant driver becomes present (it ought to recognize the card and  display its name even at this point). Then, using the ICDFMT.PRG the card can be partitioned.

Note again that "format" has no relevancy here. Instead, "Clear" the suggested default setting, and then use the "split" command to give a suitable number of portions.

The suggested GEM partition size tends to be overtly small, I suppose there's no sense to keep it smaller than the other partitions. Still I kept it at 20mb just to avoid cramming files there.

The partitioning should be almost instantaneous, but the program will check for bad sectors and this will take some time. After this the system will be rebooted.

You should be able to see the partitions on the desktop after running ICDBOOT.PRG and using Install Devices from the GEM menu.


Making the drive bootable

As the computer can't boot from the drive yet, you'll still have to rely on the floppy.

To make Atari drive C bootable, run the ICDBOOT.PRG again to activate the driver and then use HDUTIL.PRG for enabling the boot.

I bothered to snapshot the desktop on the Atari, a hilariously long-winded process
This part was a bit confusing, and I didn't get it right the first time, possibly because the floppy behaved a bit badly.

You can choose a partition for the boot drive, then the drive should be set for booting and the driver will be installed on that partition. It's possible to fiddle with the boot options, and I did some too.


Not sure about these. I guess I checked the "Falcon" for Boot Res and that's it.

Don't copy the ICDBOOT.PRG to the AUTO folder of the hard disk, it does nothing there.

After the boot works, You can Install Devices from the desktop menu and then Save Desktop. The Falcon should now boot to the system and show the partitions on the desktop.


Reaping the rewards

Strangely enough the disk drive (or the floppy) started working erratically during the process. But I managed to get the XYZ.TTP onboard after which I could leech off everything over the serial on 9600 speed.

After getting DRVIN.PRG, SCC.PRG, XCONTROL.ACC and SERIAL.CPX I could get the faster 57600 speed. The DRVIN.PRG, SCC.PRG and FPATCH2.PRG are to be placecd in the AUTO folder whereas the ACC files belong to the main folder. Make a CPX folder for the SERIAL.CPX, although you probably have to config the XCONTROL.ACC to find the files from there.

I've been toying around with this setup for a few weeks now, adding and adjusting things, and the card appears to work ok. More about Falcon later...


Thursday, 8 August 2019

Linux->Falcon serial transfer

After having a look at the Atari Falcon 030 and using the cumbersome floppies for moving files about, I wanted to move files over the serial.

I had lost my null-modem cable and could only find a mirrored 9-pin cable with M-F connectors (what is that for anyway?). The proper null modem cables were still sold at Clas Ohlson in Helsinki. Thanks, Clas Ohlson!

Serial is quite fast for sending a few megabytes or less, which is enough as Falcon files are not that huge.

Obviously, the ports have to be set for the same speed. 115200 proved to be a bit too much, so I went for 57600, which gave a healthy ~5500 bytes per second.

First, I need to set the serial port parameters using the Control Panel. This requires the Control Panel accessory (XCONTROL.ACC) in the boot drive folder and the serial control panel extension (SERIAL.CPX) on the system, at C:\CPX\ for example.

DRVIN.PRG needs to be at the AUTO folder to gain these high speed connections for "Modem 2", otherwise you'll be stuck with the 9600. Edit: It seems the SCC.PRG should be there too. Not sure which of them or both?

If DRVIN is not there, the ACC is likely to bomb if you try to fiddle with the modem 2 parameters.

XYZ on a command line shell at Atari end

To receive files using the ZMODEM protocol, you need XYZ.TTP.

Although the xyz can be run from the desktop, I prefer to use these TTP (TOS-Takes-Parameters) programs from inside a command line shell. It's a bit neater that way and I get to see the program results and recent actions better. Moving files around the system becomes quicker too.

Still testing at 9600, hence the slow speed...
Okami shell is reasonably featured, and you can use some Unix-style parameters, like directing output to a file or a serial port. It's not developed with a Falcon in mind, but using a 2-color video mode it's pretty fast. "mupfel" is another shell, but setting it up seems a bit more involved so I'll look at it later.

I added the following line inside the Okami "profile" file, so the shell will execute it on running. This way I can run the xyz from wherever I happen to be:

xyz=c:/xyz202b/xyz.ttp

Afterwards, using

$xyz

the xyz.ttp will run and wait for a file to be sent. Yes that $ is not exactly as effective as an alias or a proper PATH but it's still far better than working every time from within that folder.

As an aside, editing that profile file is bit of a chore as there are very few choices of a shell-run text editor. I'd hate to jump between a GEM editor and the command line shell now that it's in place. I ended up using something called pro_edit for now, which is rather poor and assumes the display height is 400. ST video modes to the rescue.

But if it's only a matter of adding one line to the profile, then appending that line with echo xyz=c:/xyz202b/xyz.ttp>>profile will work.

Obviously, after the file transfer is in place text files could be transferred from the Linux... But as the point is to toy around with the Falcon, why move over all the tasks to some other computer?


sz at Linux

Unlike Atari, Linux doesn't have an abundance of strange 'terminal emulator' programs, possibly because the terminal is so integral to the system.

There's minicom, but practically minicom (or anything else) uses rz and sz for file transfer protocols, so it's better to use these from the Linux terminal command line directly.

These need to be installed first. If there is a permission problem with the serial port then the user has to be added to the dialout group.

I followed a suggestion of calling sz from a tiny script (named zsend in the example) which ensures the serial port speed is correct:

#!/bin/sh

DEV=/dev/ttyS0

stty -F $DEV 57600
sz $1 > $DEV < $DEV

The ttyS0 is the device for the serial port, in my case it's already a part of the motherboard. An USB->RS232 port is often called ttyUSB0. dmesg | grep tty reveals the device names.

Saving this script as zsend, it can be made into an executable with chmod +x zsend, after which ./zsend filename should start the transfer. If Atari is running the xyz.ttp and waiting, then the file should transfer.

A version for receiving files from the PC end, use rz instead of sz.

At TOS, xyz -u filename will upload a file, defaulting to ZMODEM.

I also tried batch uploading with *.* and although everything went fine for a file, the XYZ.TTP at Atari end complained about too many handles or something after about 16-17 files. So, for moving a lot of files it's better to zip things at that end first, no matter how slow it is.

Strangely, uploading from Atari was a bit slower, some times less than 4000 bps on average. File permissions may need altering on the Linux end and the filenames tend to be uppercase which can be a bit annoying at Linux. -LL option on zip ought to force filenames to lowercase, though.

Backing up AUTO folder and your essential system files with this method is a good idea I think!


At Atari again

Transferring zip files is much more handy than trying to send files with a folder structure, and they are obviously compacted too.

Working with the Okami shell, for added comfort I also added the zip unpacker to the Okami profile:

zip=c:/packers/stzip/zipjr.ttp

...for example. The zipjr.ttp comes out of the stzip.tos self-extracting archive, found here.

$zip -xr file.zip

In Okami, this then becomes the equivalent of running zip from its folder. It appears the zip version I have it likes explicit -xr parameters for extracting and preserving the folder structure.

Lharc (lzh) is another often seen archive format, and jaymsa18 may be used for recovering files out of .msa and .st disk images on the Atari end, if the disks play nice with file structure that is.

After all this, I can finally look at Llamazap, an apparently unfinished game by Jeff Minter that can't even be started without a very specific controller. Oh, well.


Sunday, 4 August 2019

Atari Falcon 030


As an Atari STE owner back in the day, I was one of those people who drooled at the Atari Falcon before and around the time of its release in 1992. I read ST Format reports and snippets of information from Atari newsletters with great interest. The Falcon was promoted as a really bad-ass multimedia computer, beating Amiga at its own game.

When the computer finally came out, I had little chance of acquiring one, and already the magazine reports made it sound a little less than it ought have been.

Now, finally, I have some first-person experiences of this rarity.


The first physical impressions are that it weighs a ton, doesn't look that different from an ST, there's a noisy, monotonous fan inside, the keyboard is not that great and the port for the bad mouse is still below the computer (and upside down).

It also turned out that 16Mhz is not a huge leap when the new graphics modes would have needed some more heavy lifting. This is already something I recall from using a plain Amiga 1200: "Is this really it?"

Plain ST games would not demonstrate a monstrous speed increase, Frontier is now about bearable but that's it.

Frontier, one of the go-to games for testing Ataris.
The Digital Signal Processor was a saving grace for direct-to-disk recording, and with the already-established in-built MIDI ports the Falcon became a bit of a cult among musicians.

The DSP could deliver the needed punch for many kinds of games and applications, but it was not very simple to program and apart from the audio applications there was not much productivity software or games for it anyway.

More recently, skilled people have showed what can be done and there's a rather wicked-looking engine for displaying Quake 2 and Half-Life 1 levels, utilizing the DSP.

When the Landmine tried to play a sound the MP3 player messed up and did not recover.
Also, mp3 songs can be played in the background while still using the desktop. How's that for a 1992 computer?!

Theoretically, for a fleeting period in time, all the power for an Amiga-beater was inside that casing, but nothing helped people exploit the better parts of it around 1992. Then Atari computer division went down and adios, Falcon.

Oh, about the crappy photographs: I could have used a desktop accessory for making snapshot images out of the desktop at least... but I was not prepared to move and convert them around for the time being.


First things firST

Nice that I can use the VGA monitor adapter block to connect the Falcon to a modern display. The picture is not especially sharp on my display but I can live with it.

I got rid of the Atari mouse and connected a PS/2 optical mouse through a micromys adapter. (One that has C64, Amiga and Atari ST modes)

This Falcon came with IDE harddisk and 4MB of memory. I intend to look into using a Compact Flash/SD-IDE adapter but it'll have to wait. Doing that and swapping the 1.44Mb disk drive to a Gotek might not only improve the computer but help reduce the weight somewhat... not that it's meant to be moved a lot.

Which brings me to a point. These days I'm frightful about a computer that has physical hard drives but no "software shut down" to ensure the drives are stopped! (Ok some drivers come with head park software).

Universe-on-a-floppy
Luckily the Falcon floppy drive was in working order. After formatting a HD disk on Falcon I could copy files to it on the floppy-drive equipped Linux Mint.

I could also copy the aforementioned Frontier over to the Falcon. It didn't run just like that, I had to CONTROL-ALT-DEL from the desktop with holding CONTROL down.

Then, if you're lucky the Falcon will boot without any drivers and there will be sufficient "low" memory for running Frontier.


TOS, utter tosh?

Looking at GEM/TOS I am surprised how little has changed from the Atari STE days.

As I had a "bundle" of software ready on the IDE drive, I could have a head-start in exploring different kind of programs without having to install much.

The first impression is that the GEM/TOS is perhaps even slower than before and not that much has been done to improve it. Switch on the software-based MultiTOS and it'll get even slower.

The early-to-mid 1990s desktop experience, complete with a modplayer.
I could get the modplayers and mp3 player up an running, trying out some utility software in the meantime. It was a nice moment, but the environment did also crash and glitch a lot. The sound tended to conflict between applications like the FalconAMP and Landmine (minesweeper clone), keyboard clicks got stuck in a loop one time and so on and on.

But I have to recall that using the Workbench of the Amiga was a long process of weeding out software that didn't work, and learning my way around situations that could potentially crash the computer. So the same likely applies here: if I really had a motivation to use the Falcon for months and months the software collection and my practices of using it could develop and I wouldn't encounter these problems.

The 4MB of memory is not luxurious when it comes to using the multiTOS, I saw that at times much less than 2MB was left available when trying to run a couple of apps together.

Turning off the new-fangled GEM options using the CONTROL reset trick does show the desktop can be faster compared to an Atari STE.

Apparently more flexible video modes are possible but the desktop allows only a few combinations. Note that the Falcon modes easily eat up far more memory and speed than the 32k of ST modes. The difference between a 256-colour 640x480 and 16-color mode was about 300 kilobytes.


Instead of descriptive or explicit resolutions a somewhat confusing "40 columns/80 columns" and "double line" terms are now in use:

40 columns: 320 pixel wide
80 columns: 640 pixel wide
Double lines on: 240 pixel height
Double lines off: 480 pixel height

The higher resolutions are available as 2 or 16 colour modes, whereas the lower resolutions support 256 or even 65536 ("true") colour modes.

I recall the day when the prospect of having such a luxurious amount of colours in an image was in itself fascinating and something to be desired!

The ST-compatible legacy modes are Low resolution (320x200x16), Medium resolution (640x200x4) and High Resolution (640x400x2).


Yet...

It may sound I'm very negative about the Falcon, but in truth it's kind of growing on me.

The computer has that Atari ST feeling, a kind of simplicity and straightforwardness. Like when you look at MS-DOS and think "why wasn't this enough?" except it's graphical.


What I am glad about is the amount of options for connecting and transferring files. PC-compatible HD floppy, RS-232, IDE...  I'm thinking about the Apple Macintosh where you have a quite closed system and very limited choices for transferring data into it.

I also got over the somewhat clunky-looking and slow desktop, especially when I noted that using the ST compatibility modes makes it faster.


Monday, 29 July 2019

Some C64 stuff at Vammala Party 2019

I've not released anything for the Commodore 64 during this year, and I got to rectify this situation by making a couple of works for the Vammala Party demoparty:


A Small PET for Man (C64 PETSCII)


I don't usually base my images on photographs,  but in this case I did use more or less three different photographs as some kind of reference for the different picture elements. Especially the landing module.

I resisted the temptation of adding any 'moon hoax conspiracy' elements, that is getting really stale.


Fixertron (C64 Hires)


A sorts of sequel to Remote from last year, I heavily reworked an old work-in-progress image. During the process it got a character-graphics vibe, it could almost be done as a PETSCII.

This somewhat benefited from a new feature in (yet to be released) Multipaint, the quick mirroring of the whole page. As is well known, mirroring a drawing/painting/image can reveal mistakes that were not apparent from overt familiarity.


PET McKracken (C64 "demo" using PETSCII)


I discussed this triple-wide PETSCII already a while ago, but now it's available as a C64-running version. The landscape simply scrolls left and right, playing an atrocious rendition of the first few bars of the Zak theme.

Admittedly more could have been made to work it into a proper demo, however I was already struggling to get the pixel scrolling working.

That's it, nothing else, no hidden parts, no interactivity and no, I'm certainly not going to remake Zak as a PETSCII game. There might be a tiny chance I could work the technique into some other type of a game, though.

Other C64 Vammala party 2019 stuff at CSDb

Wednesday, 10 July 2019

Proton, Steam, Elite: Dangerous on Linux

I've been bit more interested in Steam/Linux gaming recently, but although the number of native Linux steam games has been on the rise, some interesting recent Windows games have been missing.

For some time, there has been an initiative called Proton, derived from wine, and this helps launch Windows-native games on Linux after installing them legitly from Steam. As this project is maturing, even mere mortals like me can get Windows games up and running on Linux.

After enabling Steam Beta, it's even possible to run games that are not even white-listed.

There's a collective effort to list experiences of working games at https://www.protondb.com/ with tips on how to get them running.

Promises of having Linux versions of Witcher 3, GTA V, No Man's Sky etc. made this look credible and I felt need to get on board too despite not wanting to play exactly these games.

Xpand Rally, perhaps a bit lame title, but it's a Steam-purchased Windows title running smoothly on Linux! 
I had a couple of Steam games from my Windows days, and Xpand Rally was one that worked immediately through Proton.

This was an encouraging experience, and although Lara Croft and the Guardian of Light did not work, learning it was a DRM issue was also reassuring.

Titan Quest
Edit: Titan Quest Anniversary Edition worked straight out of the box.

Prey
Edit 2: Prey seems to work too, and quite smoothly at that. That's nice!


Elite: Dangerous

One of the games that got me interested in gaming in the 2010s was Elite: Dangerous, the ambitious, Kickstarter-famous sequel to Elite and Frontier. But I never got around to playing it as I did not have a suitable Windows computer.

But now, with Proton it's possible. Elite is not one of the whitelisted games and judging by the community's efforts, it was not one that would run very easily, despite comments:

https://www.protondb.com/app/359320

But the bottom line here was that Proton itself need no longer be built from scratch for ED and the game itself can be run through Steam.

The game launcher window, prior to launching the actual game client window.
My initial experiences were not too promising. After installing wine and protontricks, although the game launcher, game intro and menus seemingly worked, the game itself started with a screen that quickly faded into black and I could only hear the game audio.

After I updated the nvidia drivers to version 430 (from 3xx), I could get something visible:

No, that's not a sun, just a ringed planet.
The joy was a bit premature, as the graphics were somehow too bright, and not consistently either. The over-bright gfx flickered on and off semi-randomly.

However at this point I was quite certain the game could be made to work. The above screen was a result of having a wrong (sub-4) version of wine installed, and generally not paying too much attention to the tips.


Sidetracked

In the meantime I messed up my Linux Mint 19 installation, wrecking Python 2.7. This I found out when trying to fix something that prevented 'apport' from upgrading in the update manager, losing the Mint main menu in the process.

I doubt it was the result of following the ED install instructions, it's probably I got the bright idea of removing some crucial package at some point.

At the darkest moment I considered reinstalling the whole system, but eventually I was able to remove and re-install enough packages by hand and with synaptic, to get the system on rails again.

What I learned from this that Linux Mint is quite dependent on Python in many places.


Getting it to work

After this, I went back and followed the instructions (https://github.com/redmcg/wine/wiki) more precisely, getting the right versions of stuff.

I installed wine-staging instead of wine, and then winetricks, needed by protontricks. I then ran protontricks 359320 dotnet40 win7 again in the terminal and now I got much better results:

Windowed, lower resolution
After this it was more a matter of adjusting the graphics parameters (there are many).

In its 1920 x 1200 glory, the game appears to work very well and smoothly on the 1050 GPU. Possible exceptions are some of the station/docking scenes where there is more stuff on-screen.

But Elite is by no means a new game anymore, so such good results could be expected. I'll probably talk about Elite: Dangerous more in the future, given that I can now compare it to my experiences with Everspace.

Full screen 1920 x 1200 resolution
So, whereas I would not agree ED "works out of the box" from Steam/Proton, it still can be run via Steam and when it works there have been no hiccups. Only thing is that it tends to refuse to run the intro some times, preventing the game from loading.

It may be helpful to reboot the computer but then again not, sometimes I felt I just needed to kill the process and run it again from the launcher. This is just to say that the "black screen" after the game launcher screen might not be decisive.

I wish I could have included a step-by-step history of all the tiny things that needed to be done to get this up and running, but I just can't remember it all anymore.

The instructions at the wiki seem innocent enough at first, but in order to install something, often a couple of other things needed fixing, installing or re-installing. This would initiate a cascade of activities that all needed to be done before the first step could be completed. But I can't stress enough that the instructions need to be followed quite precisely, or you may end up wasting time on a half-made install.

Thursday, 13 June 2019

ZX Evolution joystick port


A tiny upgrade for my ZX Evolution computer, housed inside an Antec mini-ITX case.

As an aside, when I opened the case from the wrong side I noticed there's room for a drive below the motherboard. This has nothing to do with the joystick but I thought I'd add this memo to self here too.


Anyway, the joystick

Sinclair ZX Spectrum had no definite joystick standard, even though Sinclair had provided their own with the Interface I/II. Many games offered the selection between Keyboard, Cursor(joystick), Interface II/AGF/Protek, Fuller, Kempston/12L...

I suppose most if not all, accepted an Atari 9-pin standard one-button joystick. How the inputs were read by Spectrum differed. The interfaces were produced by third parties, and some did not interfere with the keyboard input unlike the Sinclair solution.

Not an unlikely choice
Kempston was the most popular and became a de facto standard. As a child I didn't have a clue what the word meant, but now it's easy to check that Kempston is a town in the UK, and Kempston Micro Electronics is the company that produced these interfaces. They also made some joysticks of their own.

Even after other companies produced compatible interfaces the name somehow stuck. I guess British video game companies and Sinclair also preferred not to have the name 'Atari' shown around so it made common sense to call it something else.

The publisher Ultimate could have helped cement the name and the standard, as they supported Kempston in their games and their games were hugely popular of the early lot.


Making the port

ZX Evolution supports the Kempston IN 31 standard with on-board pins, so there's no need to solder anything. I could also connect to the suitable keyboard rows to make a cursor joystick, but I went for Kempston/Atari.

I had a COM-port extension back panel for PC lying around, and after salvaging the actual connector it could be used as the joystick port.

I had previously connected a transparent acrylic panel to the backside of my ZX Evolution case, which houses the likewise DIY connector for RGB.

This kind of plastic is a bit too hard and tends to break when mistreated. At least the two holes on both sides of the connector are smooth.


I then continued to drill holes to cut out the shape for the interface.

I turned the drill along the direction of the cut to get it behave bit like a saw. This is something I should not have done, but I had no other solution at hand and the whole piece of acrylic might have fractured had I used a larger drill.


I finalized the cuts with a small saw and the center piece fell out. The result was smoothed a bit with a file.

It's a bit crude as the connector is attached from behind and doesn't have the covering piece of metal the RGB connector (that DIN a bit further off) has. However it stays in place firmly and that's enough.


At the top, the new 9-pin Joystick port and the RGB connector. Below: SD, RS-232, micro-USB, VGA and audio/tape plugs.

I had a go at Atic Atac using a TAC-2 joystick. This is the first Spectrum game I recall playing with a joystick, and to my surprise I could now complete it easily. Just remember not to eat every 2nd food so you'll have more spares later :)