Thursday, 14 July 2022

Tool time: Drill guides

I got a drill guide and a doweling jig, after a situation where these might have been useful. But I can at least blog about them.

In the past I have managed with drilling through a wooden block and using that as a guide, but these ad hoc pieces easily get lost and mixed up.

When ordering from the internet, half the trouble is knowing the Finnish words for some items. Again, when writing this blog, there's the added trouble of finding the English words.

So:

Wooden dowel pin : Poratappi
Drill Guide : Porausohjain
Drill Stop/Depth Stop: Poraussyvyyden rajoitin(!)
Dowel joint: Tappiliitos, Poratappiliitos
Doweling Jig/Dowel Gauge : Tapitusohjain
(Dowel drill) centre point : Tapituskeskitin
Hex key/Allen key/Allen wrench :  Kuusiokoloavain

Often Google Translate can't figure these out correctly, and the terms are not certain to begin with. According to GT, tapitusohjain is "Tap Controller", and poratappi is "Drill Pin".

Looking at item lists of complete doweling kits was the easiest way to reveal the terminology.

Dowel joints aren't exactly the state of the art, but they can be done at home without huge tools. At least somewhat precise positions and 90 degree angles are needed, so guides like these can be handy.

First, the Wolfcraft Dowelmaster jig:

This jig has an adjustable/removable block that helps position the jig against an edge. Then I can drill 6mm holes through the device.

The drill stop is almost necessary for preventing accidentally drilling through the material. The stop is tightened in place using a tiny Allen key. It did keep falling out, though, it would work better on the non-bladed area of the drill.

At this position drilling the right hand side was rather easy. To make a 6mm hole at the left side was trickier because the tool can't be mirrored. (The holes are for 6, 8 and 10mm pins respectively)

Drilling the holes through the edge was little harder, it would be helpful to have the piece attached somewhere.


As can be seen my test joint is not very precise. But the result was ok considering the wood was not very even or cut very accurately, I wouldn't blame the jig here.

The idea of keeping the device at place with your hands is fast, but also kind of crap. Especially here when working with small pieces I kept trying to find a good position.

There are more straightforward jigs that can be clamped to the piece. But the Wolfcraft jig has a few tricks up its sleeve. The contraption can be held diagonally against the edge of the wood, the edge held firmly within the "X" shape of the jig. There are two ways to do this depending on the thickness of the wood. The pinhole position can't be adjusted but at least the holes will be equidistant.

I liked the simple drill guide. ("accumobil Mobile Drilling Aid") It's not specifically made for dowel pins, but it does have the 6,8,10 sizes.

The device is better used upside-down, because what looks like the top works better for the special cases of drilling into a corner or a round object.


There are also marker lines around the guide. If you want to use them you have to mark your boards very generously because otherwise they are not very easy to see. 

Here the wooden piece is so small I couldn't even check the lines from all directions. It may be a better to make ~2mm deep initial drillhole and then finish the job with the guide.

Here I also made use of the drill centre points, these small metal pins.

The idea is that the drill hole positions don't need to be super-precise. Drill holes into the first board, then put the centre points in the holes. The second board (edge) is pushed agains the pins and the drill locations will be correctly marked.

For the edges, I again used the doweling jig, and I wasn't very comfortable with it but the result was fine. It would work much better if I had gone through the trouble of clamping and positioning the parts with more care.

So, altogether these felt robust enough for my purposes.


Addendum 15.7.2024: Having used the Dowelmaster more it worked fine enough. The adjustable fence is ridiculously low compared to some similar models I've seen. In some situations this may save space but here end-wood doweling felt risky. The weird shape of these objects can prevent creative clamping. Also, adjusting the position would be easier if the tools were more rectangular. I checked the clamped position using a light, peering down the jig hole.

Thursday, 30 June 2022

Summer update


After having the eletric kickbike for more than six months, I have barely 150km in the odometer. During the hot and dry summer days this might change.

I still occasionally use the voi rental scooters, because it is sometimes just handier to not stress about the parking. Although, with the attention now given to mis-parking, it can be slightly stressful too. Also as the number of rentals in Helsinki is growing (voi, lime, tier, dott, bird) I'm somehow happier not having to think about them.

But the voi handlebar is really stable compared to my "zeeclo". In fact it is one of my on-going gripes with this model, it is somewhat shaky and needs to be aligned with the wheel from time to time. I mean, how difficult it would have been to design so it wouldn't rotate at all?


I bought a modest lock that should prevent the simplest thieving actions. 

But I haven't decided what would be the best solution here. Collapsing the kickbike perhaps draws less attention to the vehicle and could discourage people from fooling with the controls. However, in this state it could be carried rather easily away after cutting the lock.

Apart from the lock, I have bought an electronic pump to adjust the wheel pressures. This I will discuss separately at some later time. 

Let's just say I avoided the weird generic instructions at the Zeeclo website which suggested the wheels could be set at 50-60PSI. It might not be applicable to the Zeeclo Fenix at all. I instead followed the value of 35PSI found on the wheels itself. The vehicle is marginally faster when there's more pressure in the wheels.

I would have taken it to the workplace earlier, but the elevator was fixed only recently. It barely fit into the small space of the elevator! Mind you, the distance to work is so small I barely need the scooter for my commute.

I have kept quite accurate record of my travels. Without making it too obvious where my homebase is, I combined the extents of my journeys into a single image, courtesy of Google Earth and the handy "path" function.

The map doesn't mean I have driven extensively in the city centre. On the contrary, I have mostly avoided the central areas, instead favouring dedicated bike routes even in cases where they make the trip longer.

The supposed 20km range (10 there and 10 back) gives some limits to these trips but I have not really even used this range yet. 


Wednesday, 15 June 2022

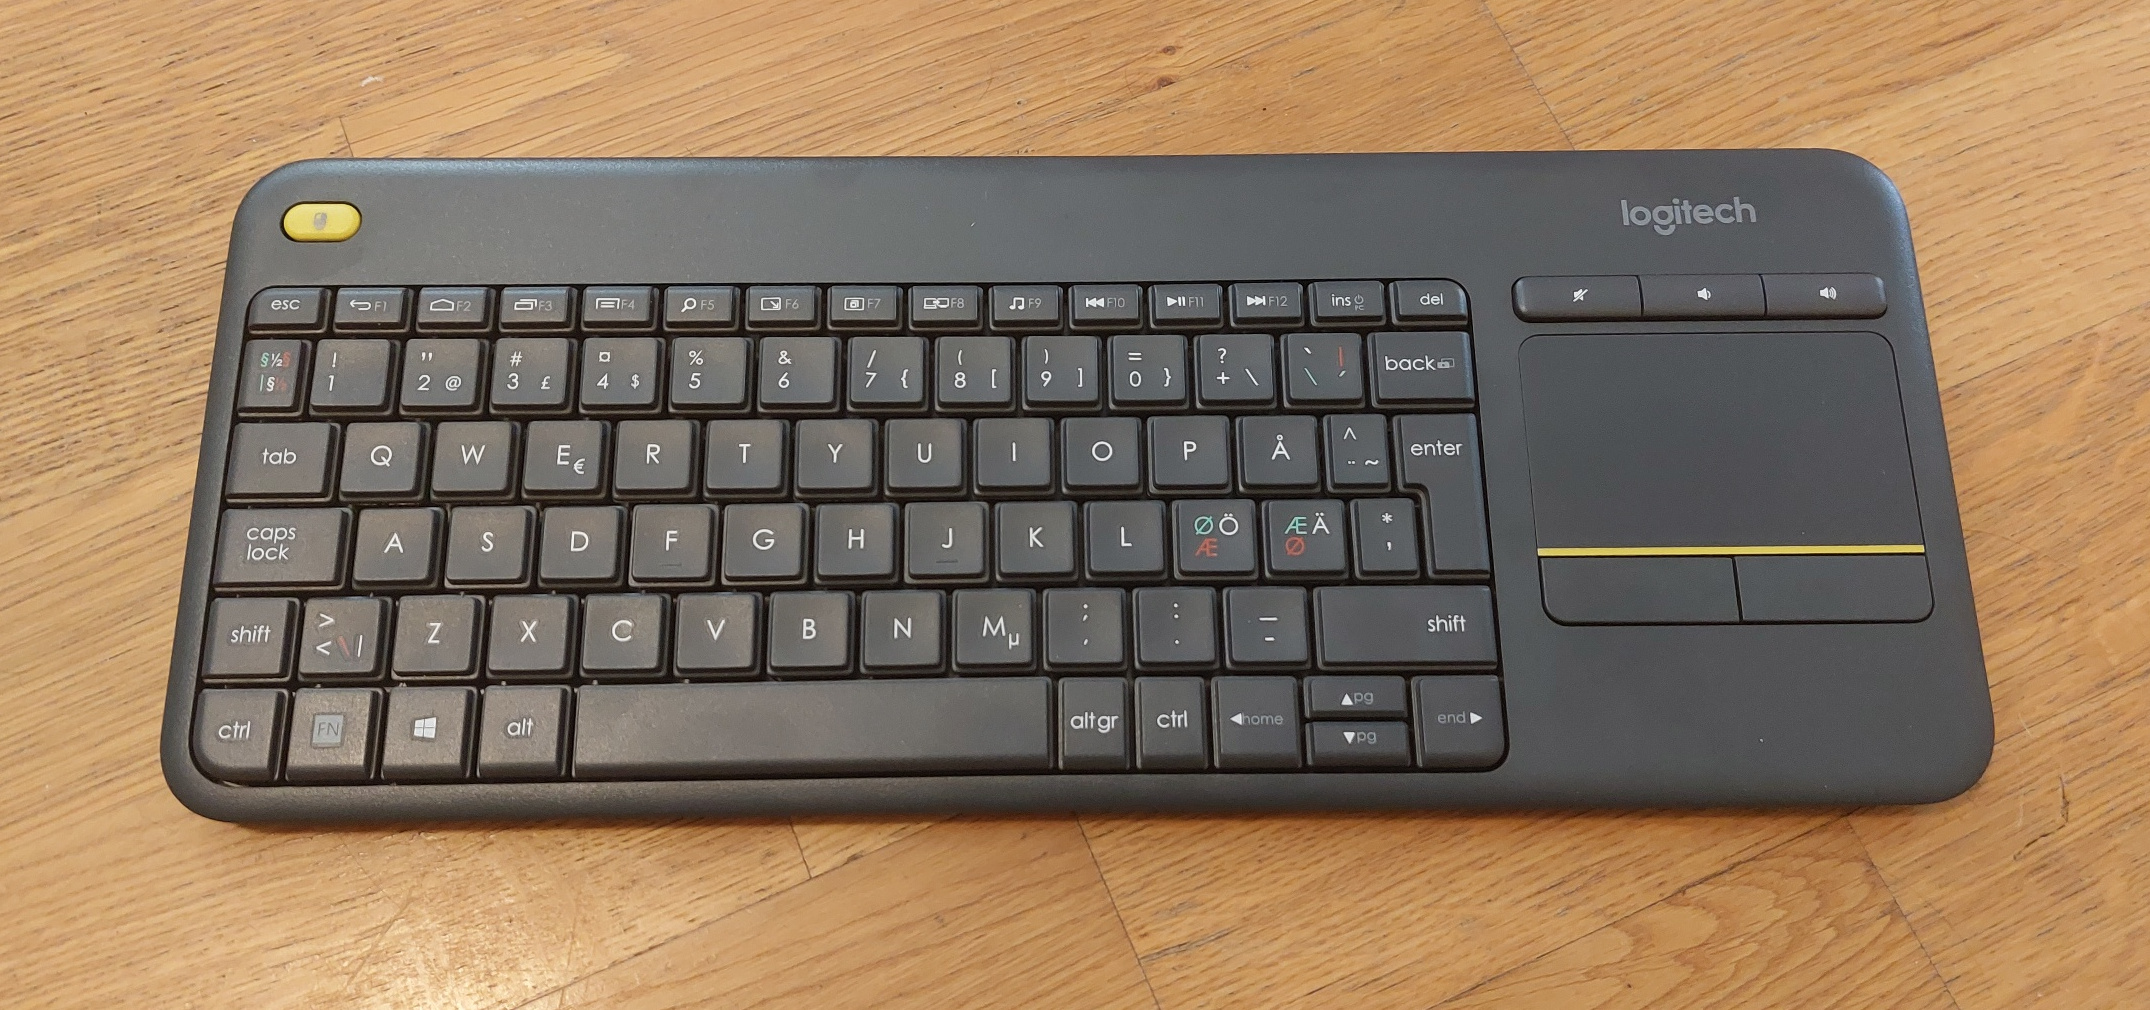
Logitech K400plus keyboard

I am not a huge fan of wireless keyboards, but for this "TV controller" I made an exception, especially as it is a combination of keyboard and a trackpad. With this I can access a Linux computer connected to a TV at the other side of the room.

In the past, I have looked at various phone-sized micro-keyboard solutions but it's perhaps good I did not take that route. I need to type in terminal commands or even edit configuration files, which would be too painful with tiny keys.

The not-too-powerful Fujitsu Esprimo Q510 works as the video source, running Ubuntu Linux. When I plugged in the USB dongle, the computer responded to it immediately, no problems.

The lightness of the keyboard case is here a bonus but understandably it is also somewhat plasticky.

The feel of the keyboard itself is adequate, which likely means I'll get used to it. The styling gives an appearance of flat keys, but they are really not that flat. The key travel distance is larger than for example in the Apple keyboards. The keys are quite silent compared to the mechanical keyboards I have been using lately.

The compact cursor key cluster is not ideal for these kind of keys. It's also possible to accidentally move your hand over to the trackpad when typing at the right hand side.

The mute and volume keys worked as expected.

There is a mysterious yellow key at the top left corner. I hoped it might switch the trackpad on/off, but it is really just the left mousebutton. This seems unnecessary as the trackpad has buttons, but it can be useful if I hold the keyboard in both hands and try to do something with the mouse.


There's a power switch too, hopefully it helps save batteries. The manual promised 18 months of battery time, I'll have to check on that promise.

I did encounter some hiccups with the key transmission, likely because there were obstacles between the keyboard and the USB. I need to continue using the keyboard to see if it really happens again. 

For what it's worth, I switched the USB transceiver to a different port as it was "behind" the wlan interface in relation to the sofa. I think it would be better to place the USB wlan to the other side entirely.

This keyboard looks like a good solution for the TV. When I have used it more, I can comment something about using the screen from distance. Only after zooming the terminal window, I could really see what I'm typing from across the room.

Thursday, 26 May 2022

Spring Cleaning the CPC Keyboard

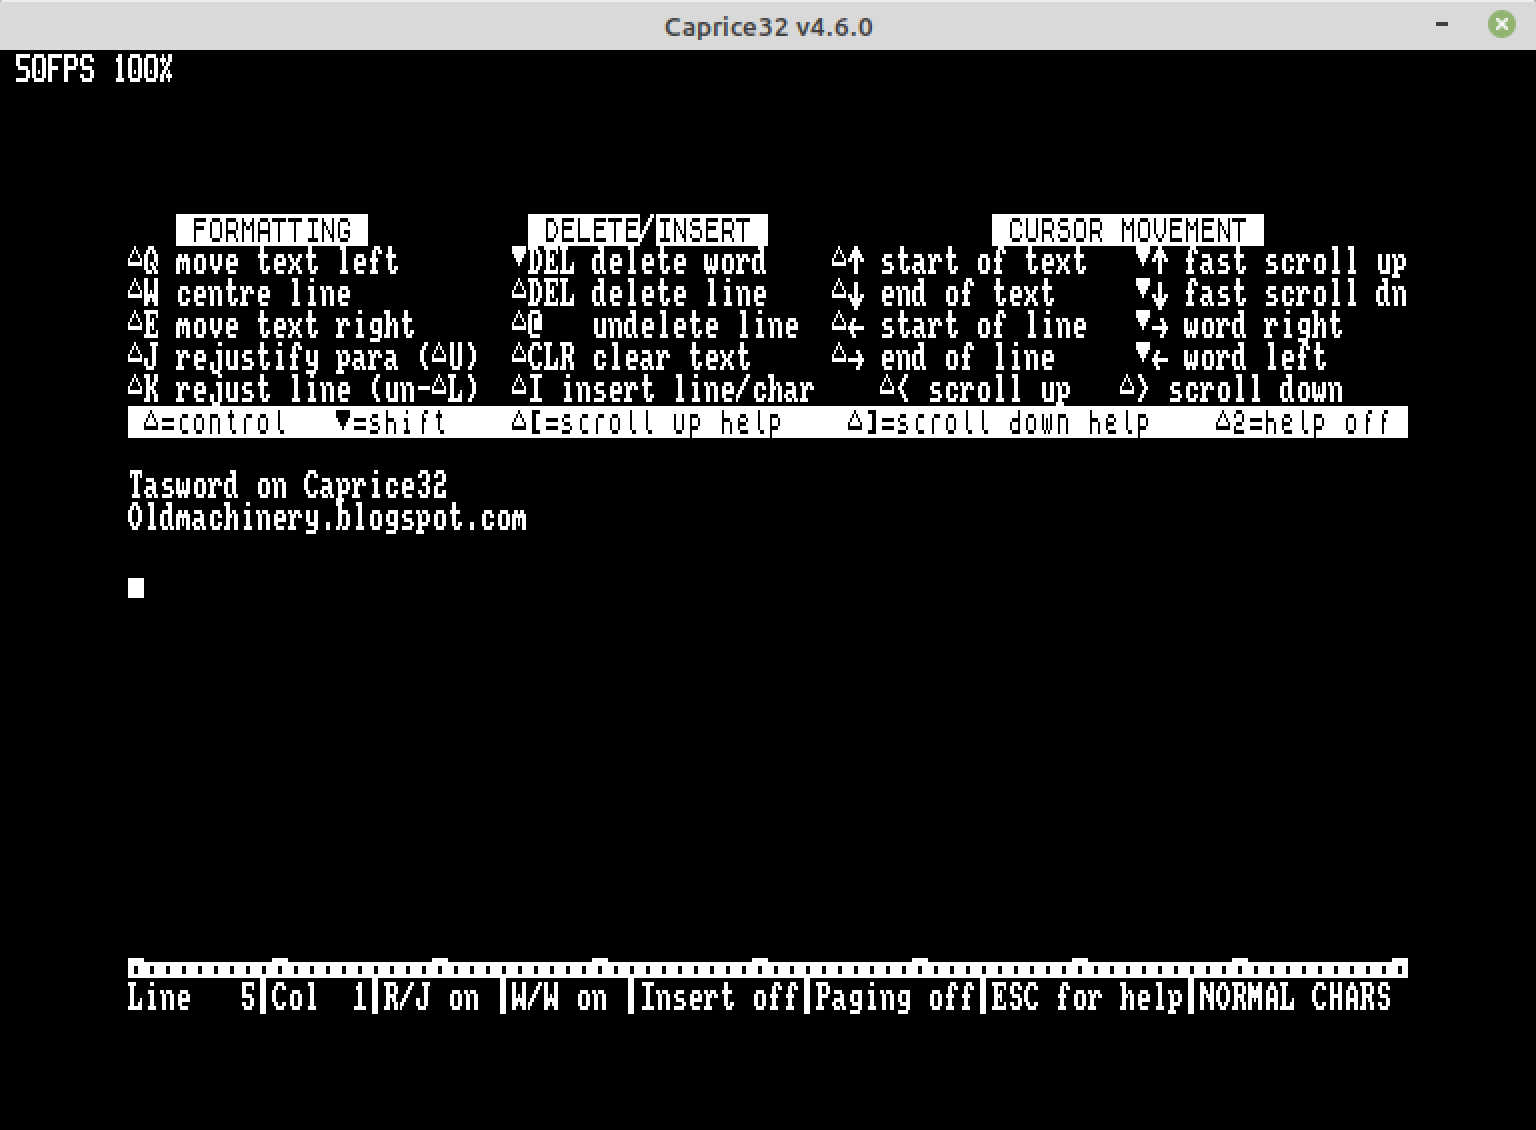
Again, written on Amstrad, mistakes and all:

After experimenting with writing on Amstrad and the Tasword, I felt something could be done to the keyboard. It's not that the keys didn't work, but they tended to get stuck.

As a remedy, I decided to open the keyboard, have a look inside and clean anything that might look suspicious. Old keyboards do need some care.

On removing the keyboard module, I realised how much more impressive this is than the Sinclair membrane system. The membrane is hidden inside a very protected environment, where very little or no dust can interfere.

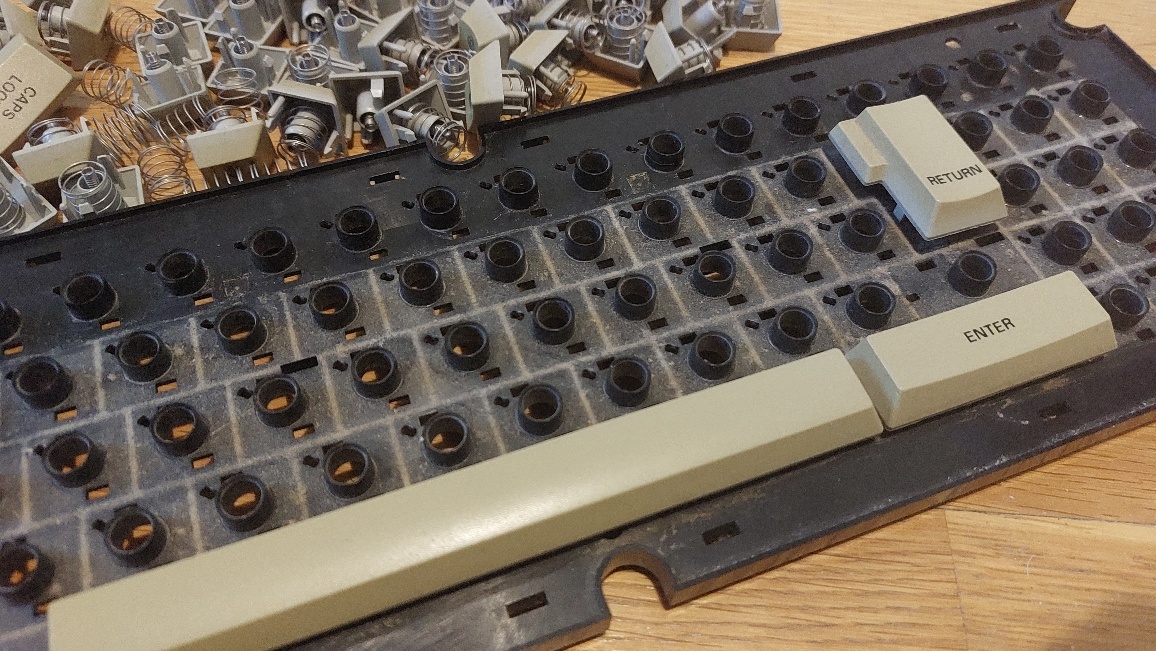
After carefully peeling the keyboard layer from the metal base, the parts become revealed. On top of the metal base there is the membrane, and on top of that lies the black plastic frame for holding the keys.

At this point, there is almost nothing to do, as the insides of the keyboard module are surprisingly clean. Just a light dusting off is enough. Then I can get into removing the keys.

Each of the key has two or maximum of two "hooks" which have to be carefully pressed inwards to make the key fall off. Fortunately my fingernails are of the correct length here, I could remove the keys rather easily.


I left the more difficult looking wide keys last, as they also have a tiny metal rod to balance the keypress. These keys I removed one at a time, cleaned them and their surroundings, and put them back immediately. This way I wouldn't get confused with parts.

With the Return keys I noticed one of the "hooks" were missing. However I am almost certain I did not break it myself. Putting it back together the key felt ok, it doesn't really need both of them.

Then began the tedious process of cleaning each of the keys and generally fiddling about. I didn't have a master plan here, I felt it ought to be enough if I clean everything with somewhat moist Q-tips. Although with them I have to take care not to leave the tiny pieces of fabric the Q-tips tend to leave.

Just to feel I'd done something I strecthed the large spings a little before putting them back into place. Experimentally I also filed the keyboard holes a little in the hope this would prevent them getting less stuck.

Then everything is put back together, everything's fine? Not really at first. To my horror, a single key, the key F did not function at all. There were also some problem with space key producing two spaces more often than one!

Having a single key non-functioning meant the problem was not in the matrix, as this would result in a cluster of non-functional keys. So I pushed the key with some more force, and I heard a not very reassuring "SNAP". Fortunately this was the snapping together of the final hook between the plastic case and the metal plate. For some reason I had neglected to check if they are really properly all together.

I also gave the keyboard a sort of bash-around, bit like a guitarist does to strings after changing them. This seemed to help a little and the nuisances were mostly behind. I still feel something is off with the space bar, but at least it doesn't double-space anymore.

As a test I wrote the above text and this paragraph with the Tasword. Although not everything is perfect and I have not yet become used to the keyboard, it's already better for typing and I can perhaps dare say it could be better than a Sinclair QL keyboard after all.

I felt more encouraged to do this now that I got my HxC floppy emulator write problems resolved. The writes simply failed before I disconnected the internal floppy drive entirely. So, now I don't have to resort to photographing the screen but instead had to find a way to get the file to the Linux enviroment, a much more interesting task.

End of part written on Amstrad.


Back to Normality


I was so eager to transmit the above text to Linux, I did not check it and so there are a few typos.

The photograph below shows the plastic hook of the return key was already broken before I removed the key. Left from the center and a little down. Nice!

After some more typing I felt I could still open the keyboard one more time and improve some individual keys. At least the keys no longer become stuck in normal typing.

Getting the file back to Linux was easier than I thought. The HxCFloppyEmulator GUI version helped me convert the .hfe file into an Amstrad .dsk image.

Possibly because the image had not originated from iDSK, that program did not recognize it. Luckily I already had compiled the alternative sector-cpc. This did the job:

./sector-cpc --file blogpost.dsk extract post2.txt

This digs out the file post2.txt from the blogpost.dsk image file and saves it on the Linux filesystem.

Looking at the text there were some idiosyncrasies. Although I had written everything as paragraphs, pressing return only at the end, the file had 0x0D and 0x0A (Carriage Return and Line Feed) after every visible "line":


The spaces that Tasword had visually inserted to help center the columns are actually included as characters! For this one case, I manually formatted the paragraphs and used find-replace to destroy the double and triple spaces, before copy-pasting the results to Blogger.

The image above also shows the garbage at the end of the text proper, partly a leftover of earlier editing. Whether this was something the sector-cpc produced when exporting the file, I'm not sure.

These issues can probably be adjusted in the Tasword settings, should I continue with my 8-bit writing career in the future. Alternatively I could write a program or script for tidying the text files.

Sunday, 22 May 2022

Blog post written with Tasword on Amstrad CPC6128

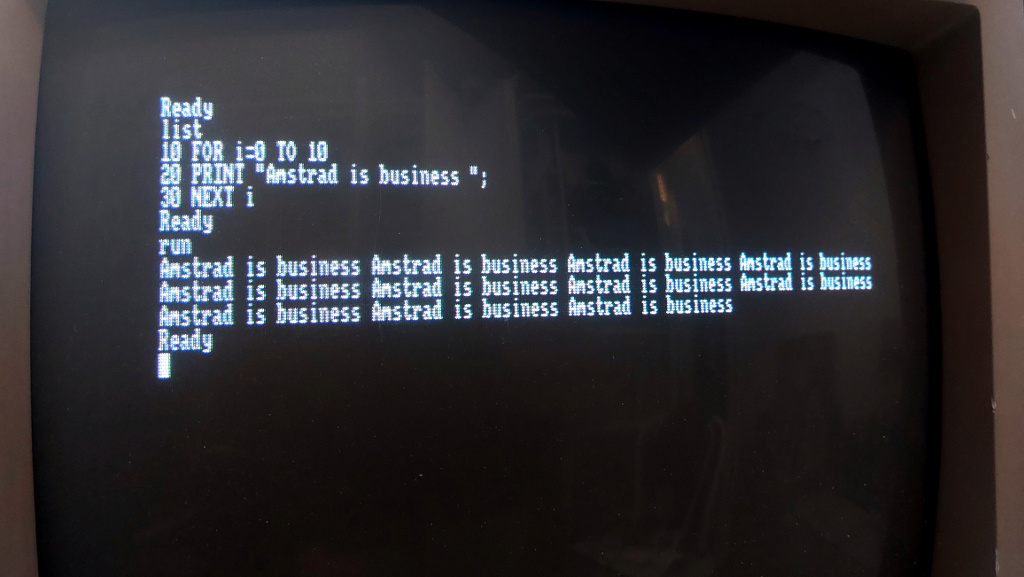
The text below was written using an Amstrad. Sadly, my HxC floppy emulator refused write operations so I couldn't save the text. Instead I photographed the text from the screen and retyped it all here, without changing anything so all the silliness and possible mistakes are present.

(Later note: Got the HxC write working by disconnecting the CPC internal drive.)


Blog post written with Tasword on Amstrad CPC6128

As soon as I learned that I could use the 80-column wide graphics mode on Amstrad CPC6128 and the 1084 monitor, I wanted to try out text editing on it. The first program I could find was Tasword, and it looked promising enough.

Tasword was a familiar name for me from the Spectrum days. Then it had a reputation with cramming 64 columns on the 256 pixels wide display. And being an overall comprehensive enough editor.

Here with Amstrad CPC6128, I guess the program is the same old, except it doesn't have to resort to gimmicks in order to display 80 columns of text. The 640 pixels wide mode 2 is perfectly capable of showing it all.

In fact, the experience is rather similar to using a text editor on an Amiga or Atari ST. The major difference is the obvious lack of mouse.

Typing text diretly into paragraphs is quick enough. The keyboard has seen better days, but I am not so sure if this is better than the Sinclair QL. The cursor keys are well positioned here, one of the first home computers to get it right I guess.

Writing text between existing paragraphs appears to be fine at first, but when the cursor reaches the edge it will start overtyping the paragraph below. Turning Insert on helps here, the problem was just that the Tasword does not have it on by default. Furthermore, you will have to turn on Auto-Insert to get the behaviour you'd expect nowadays. This is pretty slow! Creating new lines between already existing text is predictably slow, but not horrendous.

I have written this post mostly from top to bottom, without stopping too much to think what I ought to write. If I had to start editing the already existing text, it might result in problems, as I don't know what keys and what functions I am supposed to use.

The above paragraph was moved from above to a more suitable position. This was achieved using the Block Mark, Block End and Block Move commands. Then I had to use Delete Line and Insert Line to tidy up the space between the paragraphs. These are typical functions of old word processors, and I'm no longer under the illusion this is a more modern editor.

As the program is 6128-specific, where I think this shows is the program is occasionally using a RAM disk of sorts. There is more than 60K available for text, surely this would be enough for a school essay or a chapter in a novel.

All in all, not a bad experience, but if I was writing a longer text or something with more thought required, I would be missing the mouse movement and quicker copy and paste. Then again, this kind of old software could encourage planning the text in some other way. Possibly I'd outline and sketch it on paper first and then just clean up the manuscript on the Amstrad.

I did not look into other text editors, I guess the Amstrad scene might have produced slicker applications at a later day. I didn't really look into the matter, but perhaps another time!


Saturday, 21 May 2022

Amstrad Odyssey

This Amstrad CPC6128 has been with me for many years. I didn't have an Amstrad CPC in the 1980s, I don't think I ever even saw one back then. But certainly I felt the presence of the brand in many advertisements and magazine articles. 

As Amstrad bought Sinclair, I have had somewhat mixed feelings towards a company that both rescued the Sinclair line but perhaps didn't do as much as could have been done to move it forward.

As a later entry to the 8-bit game, the CPC and especially the 6128 tried to improve the earlier home computers:

  • A decent keyboard with cursor keys at the right place
  • Variety of graphic modes for both utility and games
  • Flexible BASIC with graphics and sound commands
  • Disk drive as standard
  • Good display options

The 6128 is perhaps one of the more better thought out 128K 8-bitters, not suffering from the Frankenstein nature of Spectrum 128 and Commodore 128. The Finnish Mikrobitti magazine even declared the Amstrad 6128 as a computer of the year as late as January 1987.

However, the market was drying out that point so there were not that many models to compare it with. It's even debatable if the CPC6128 is a better deal than the Commodore 64 from 1982!

Yet I can imagine that with the 640-wide resolution and the disk drive, text editing could be rather nice. The specs also helped it run the ageing CP/M.

Anyway, around this time it started to look like a dead end to the whole 8-bit generation. The Z80 processor was struggling to move around all those graphics, and the memory had to be banked. And even if they had put in even more memory, the contents would have to be loaded. Slowly.

Faster Z80 processors and better storage devices might have extended the lifespan of these machines, much like with the eastern bloc Spectrum clones. But at this point Europeans had switched their attention to the increasingly affordable Atari ST and Amiga models.

The Amstrad video chip has been proven to be quite capable, at least for various demoscene tricks, but without sprites the games couldn't hope to be very fast.

Compared to Spectrum and C64, it has been somewhat painful to get software up and running on a real machine!

There are a couple of good Amstrad emulators around.

The CPCBox even works online:

http://retroshowcase.gr/cpcbox-master/index.html

Here's a list of emulators:

https://www.cpcwiki.eu/index.php/Emulators#JavaScript_.2F_HTML5

Arnold is a name that comes up, but for some reason I've used Caprice locally. Possibly it was the first I got running on my Linux and did what was needed, that is I can feed in an automatic Amstrad command line when running the emulator from the Linux command line. For example:

cap32 mydisk.dsk -a 'run "picture.bin'

...would attach the mydisk.dsk image and feed in the basic command to run the file picture.bin.


The Real Amstrad

This one has been modded to output the 5V regulated power to an external HxC Floppy Emulator. However, it would need the 12V in to the floppy cable dangling out.

The computer itself takes 5V, the plug is core negative, pin positive.

The dangling floppy cable has 12V core positive, pin negative.

I've sometimes taken the 5V for the HxC from an Arduino. This worked when using the HxC device for QL. But I somewhat fear the Arduino isn't able to provide the suggested 400mA minimum for running HxC with a card.

If there's no display, pressing the CLR key should give a beep from the internal speaker. If there's no sound then possibly there's something with the Amstrad or at least the keyboard... or the speaker. Remember to turn the volume up.

I had some problems with some of the keys working. I saw nothing wrong with the membrane keyboard connectors, just shuffled them around a bit and reconnected them. Fortunately this helped and my keyboard worked again. Possibly the connector had come loose at some previous time when I had opened and closed the case for some other reason.

As with Sinclair computers, the video mode is always a bitmap, meaning that text and graphics can be combined in BASIC easily. But it also means there are no fast character modes.

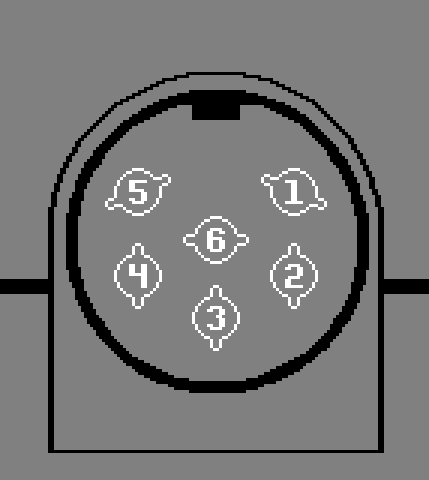
A mono-display composite video cable is easy enough to make by using the Luminance and Ground pins from the Amstrad monitor connector. This should be enough for testing if the Amstrad and the keyboard works more fully. The RGB cable is more complex and obviously requires an RGB-compatible display.


1-R
2-G
3-B
4-Sync
5-Ground --- connect
6-Luminance --- connect

And wham, it doesn't play games or demos that well but at least the CPC can be tested:

When in BASIC, the command CAT gives the Catalogue (i.e. Directory) of the floppy.

RUN is used for loading files, e.g. if there's a file called PICTURE.BIN in the catalogue, use RUN"PICTURE to run and execute the program.

A fun thing out of the luma video cable is that the 80-column mode 2 becomes usable (via MODE 2 of course) and it's not at all bad on my 1084S display. Hopefully I have some time to play with it in the future.


Multipaint and Amstrad

With my very own Multipaint, it's possible to export Amstrad graphics images in mode 0 or mode 1, and get them running on a real computer. However, there are a few steps needed to make this happen.

  • The output binary file from Multipaint, easy enough
  • iDSK program is needed to dump the file to an Amstrad disk image
  • With HxC floppy emulator, the dsk image has to be converted to HFE
With Multipaint, you have to export the file as an Amstrad .bin, not as Multipaint .bin. Confusing! I could have chosen a better file extension for the Multipaint project files.

The iDSK can be found from for example here:

http://koaks.amstrad.free.fr/amstrad/projets/

The given archive can be extracted with

tar -xvf iDSK.0.13-src.tgz

Use make in the folder, this gives warnings but should result with the functioning binary at the src folder. It of course makes sense to move the binary to usr/local/bin/ for example.

(I edited away the mention I was not previously lucky in compiling the iDSK source.)

23.5.2022 note: sector-cpc looks like a good alternative to iDSK.

With Caprice running, I could use the following bash script to both generate a new disk image, enter the chosen file to the disk image and run Caprice with that. This was helpful for testing the image display code for various modes without having to cycle through past commands again.

#!/bin/bash
#
# showimage filename
# (without extension)
#

iDSK mydisk.dsk -n

iDSK mydisk.dsk -i $1.bin -t 1 -e 6000 -c 6000

~/amstrad/caprice32/./cap32 mydisk.dsk -a 'run "'$1'.bin'

(Supposing the caprice emulator is located in that folder.)


That's enough to get the exported file working in an Amstrad emulator, but what about the real computer?

I have a Lotharek's version of the HxC Floppy Emulator to run programs from an SD card. This also presupposes the cable is correct for the CPC. 

The HxC jumpers need to be set, and the array of jumpers may be positioned differently in other versions of the HxC. 


Looking from back at the Lotharek HxC, the two rightmost pins at the top are connected, here marked with x:

...x
...x
....

Different HxC models might have the pin array in different orientation. 

Sadly I don't know how the Amstrad has been modded, apparently the internal drive is disabled so the HxC can act as drive A, because that's how it works currently.

The disk images need to be converted to the HFE format used by the floppy emulator.

Again, the converter needs to be compiled. Marq discusses it here (in Finnish) http://www.kameli.net/marq/?p=1240

When all is finally in place, the converter can be run from the command line:

hxcfloppyemulator_convert pics.dsk -HFE

After this has been done, the hfe file can be copied onto the SD card. The HxC can mount the image and the disk can be accessed from Amstrad BASIC with the CAT and RUN commands mentioned above.

Edit: I did try that text editing thing.

Saturday, 30 April 2022

Battledudes

Now that surviv.io from browser doesn't work well (can rarely get in a game) I went to play Battledudes.io instead, another browser-based 2D top-down shooting game.

The 'dudes seems to owe a lot to surviv.io. The major difference is that the players respawn to the same game, whereas if you die in surviv you will have to enter a new game. Secondly, nearly all game modes are 2-team modes and there are strictly speaking no squad modes.

Another difference is that there is no diminishing play area in Battledudes. Altogether the game is modeled more on old-fashioned deathmatches rather than the PUBG/Fortnite mold. There are modes such as Team Deathmatch, Capture the Flag, Control Points, Hardpoint and so on.

The respawning system also means there's no real inventory. Kill someone and their stuff won't be visible on the ground. Instead there's a loadout which always includes handgun, main weapon, secondary weapon, item and two different perks. You get more options through leveling up.

If you get wounded, soon after the health will replenish. Timing your reloads and healing pauses is integral to mastering the game. There are also perks that affect these elements.

The nice thing here is that nobody can find a super-weapon or super-armor. In Surviv this means that good players tended to be doubly good: both in skills and knowing how to get better weapons. Here if your loadout is crap you can continue adjusting it. That's not to say there aren't some combinations that may be better than others.

My current go-to perks are kevlar armor and +12% damage. This usually ensures that if two lamers with comparable weapons try to brute force it out, I'll win unless they have the same perks. I've also tried additional speed and visibility range, the latter can be useful for open areas. Some of the pro players seem to favor dodge and added speed, and this can indeed change the 1 vs. 1 situations.

Interestingly, everything on the battlefield can be destroyed. This doesn't reveal items but adds character to the battles and also important route-creation at some situations.

A major addition compared to surviv.io are the vehicles, such as jeeps, ATVs and tanks. These make for more nuanced situations, as players can move other players quickly over the map. I'm somewhat annoyed that the vehicles run over water just as simply as over any other terrain.

The bazooka is the handy secondary weapon for destroying vehicles. Grenades may be more useful in game modes that don't have the vehicles. They are effective in games where teams guard small areas, and in Payload it's crucial.

Despite vehicles and some added variety I could still say 'dudes is simpler game than surviv.io. The surviv.io 50 vs. 50 battles can be glorious, if there are enough players that is. The map items, bunkers and other special occasions add flavor to the game. The no-respawn rule gives more tension to the game.

When I started, Battledudes was not yet riddled with too-good players or cheaters. Now it looks unlikely I could win any solo gamemodes. As most of the gameplay forms are teams this aspect gets evened out. But team victories and losses can mean less and can often be attributed to luck.

Sometimes good players can be identified by the skin they are wearing, but not always. (Skins are bought with the in-game currencies) As soon as I donned the ninja costume the games seemed to become more difficult! It may be beneficial to look like more of a noob than you actually are.

What I've liked here is that suppressive fire works rather well; shooting at a doorway or at a corner often has a clear preventive effect. In Surviv.io, I've felt there are less opportunities for this even in 50v50, as well-equipped and bold opponents can usually work around the bullet hail.

I often use the mini-map to direct fire at off-screen targets. In other cases supporting crossfire or from flank towards the guessed enemy direction can be helpful. In collective battles this can contribute, even if you can't see the enemy! Whether mini-maps are good for gameplay is another matter.

The idea of suppression and other nuances are often lost to the inexperienced players who just want to be that individualistic "pro", swirling around enemies and going for the maximum kills and a good kill/death ratio. Having a real "pro" in your team is of course desirable.

Those who play as coordinated teams may overcome numbers of poor opponents by working tightly together and using varied weapons. Against such a force, there's usually nothing to be done and the battle will be lost.

It can then feel that winning and losing is matter of who is on-line, but on some rare occasions it can give a satisfying feeling that my actions were important in settling the outcome. In Capture the Flag this can be quite crucial.

Lot of players insist on voting for the rather boring solo modes Gun Game and Free for All. The somewhat flawed Payload is probably the most interesting mode, but it rarely gets voted. 

In Payload, one team has to push a cart on rails that zig-zags across the map to a deployment location. Get it there within the time limit and it's victory, otherwise not.

If there's one friendly team member near the cart and no enemies inside this zone, the cart will move forward. At times I've felt it is impossible to prevent the deployment from happening, but it has been done. A play style has evolved where teams lob grenades to the cart area and others try to kill the cart pushers from distance.

The dynamic is that being too close to the cart is harmful, but staying too far away the teams can't move towards their goal. Sadly, putting obstacles in front of the cart is a waste of time, the cart doesn't really care.

All in all I've felt Battledudes to be quite a robust online game. The developers appear to have not ruined it with superfluous stuff or season frivolities. Bug fixes have addressed relevant bugs. For instance, there were means to exploit the vehicles for "infinite" speed but this was soon repaired.

It remains to be seen how long Battledudes will be my go-to game for a few minutes of mindless instant gratification, but as long as surviv.io doesn't work properly and there are no better alternatives so be it.

Addendum: 14th of May.

The 7th season brought in the game mode Upload, where the team who gets to carry the flag longest, wins. This does move the dynamic of the battle around, however exploiting edges and corners of the map isn't that interesting.

There's a new device called the Trophy System, which creates a grenade-repelling field around the device. In theory this could adjust the balance in game modes where grenade-lobbing has become the go-to strategy, but it yet remains to be seen how useful it is.

I've also noted it's not always possible to drive a car, is it so that the flag-bearer can no longer use the vehicles?

I also saw a few glitches introduced, the payload destination graphic has been messed up.

Oh, and the game mode voting system has been changed so you don't see who votes what until near the end. But I'm thinking this just means I have to suffer the crap solo modes more often.